The below post may contain affiliate links. This means we will receive a commission if you purchase through our link, with no extra cost to you. As an Amazon Associate we earn from qualifying purchases. Read our full disclaimer.
Installing cabinet handles and knobs is one of the easier DIY projects you can take on.
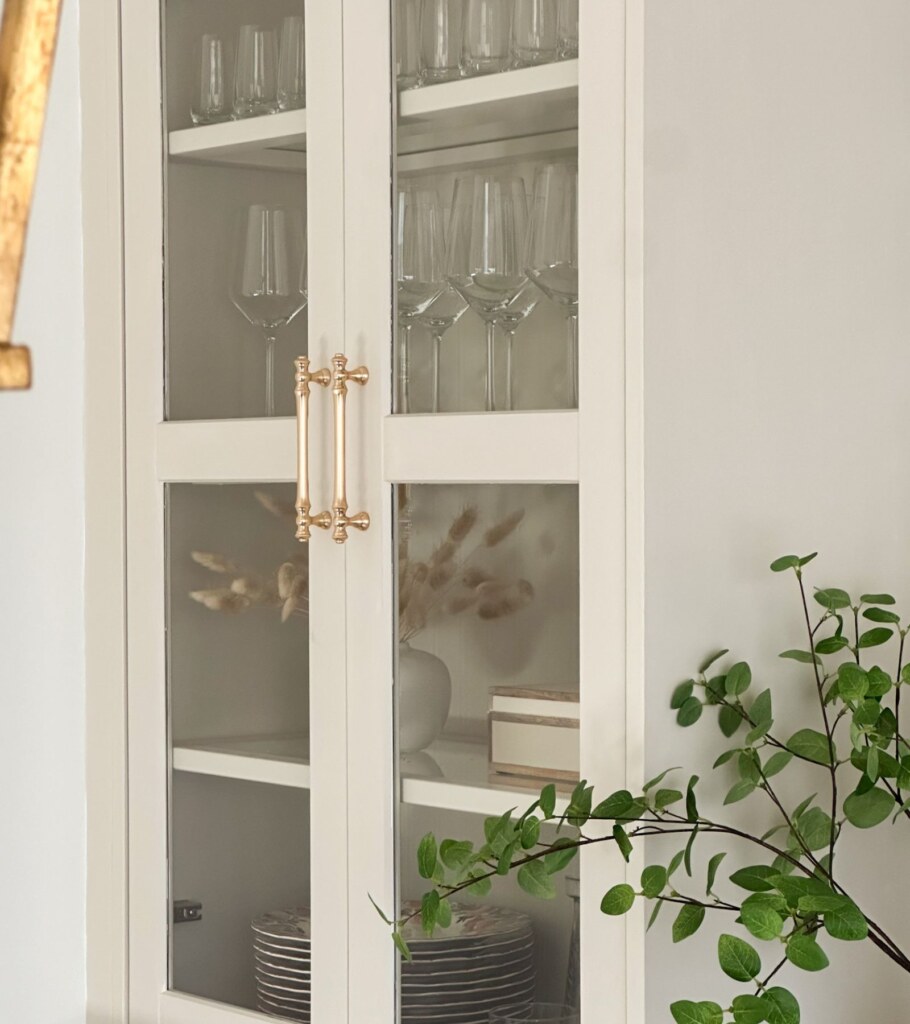
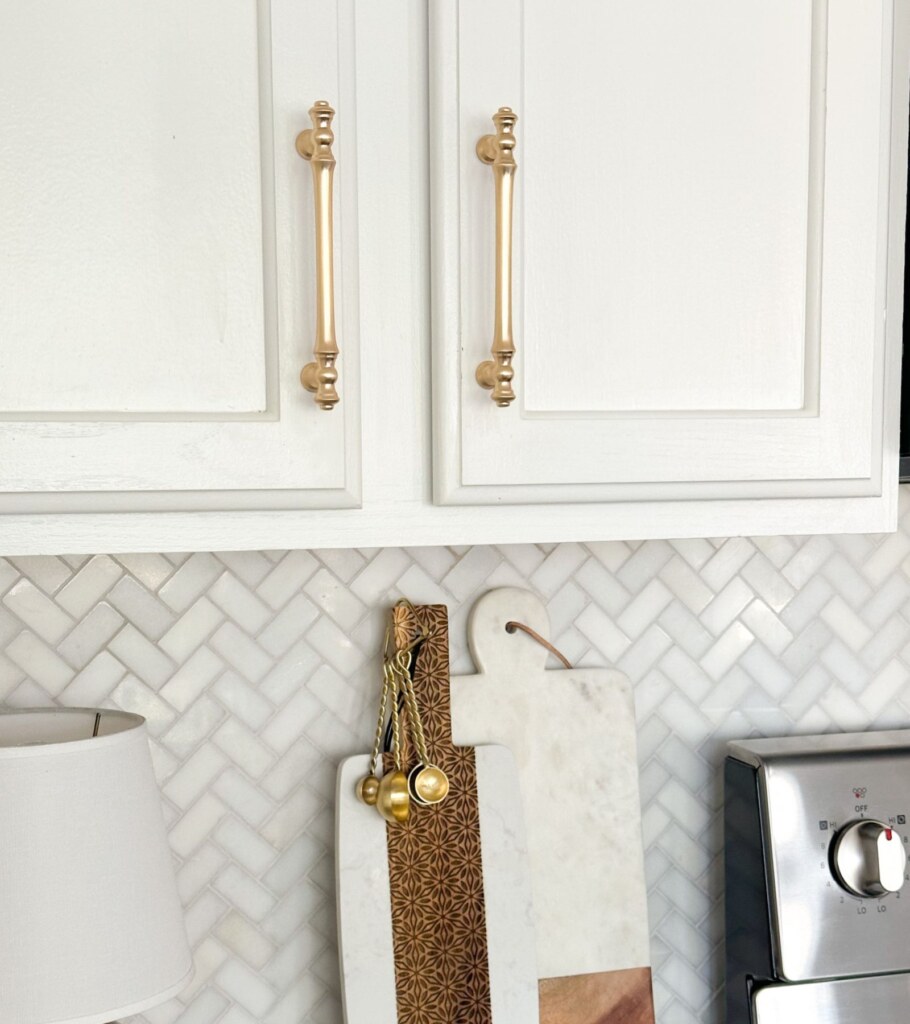
New kitchen pulls and knobs in any space, whether it’s a kitchen, bathroom, or a DIY built-in, is a simple change that goes a LONGGG way!
It may sound silly, but simply changing out the original hardware on a cabinet is a cheap way to completely transform your space.
Let’s hop into how to install cabinet handles and knobs for both cabinet doors and drawers. I’ll also cover filling holes in your cabinets from the old hardware if that applies to you!
Before You Begin…
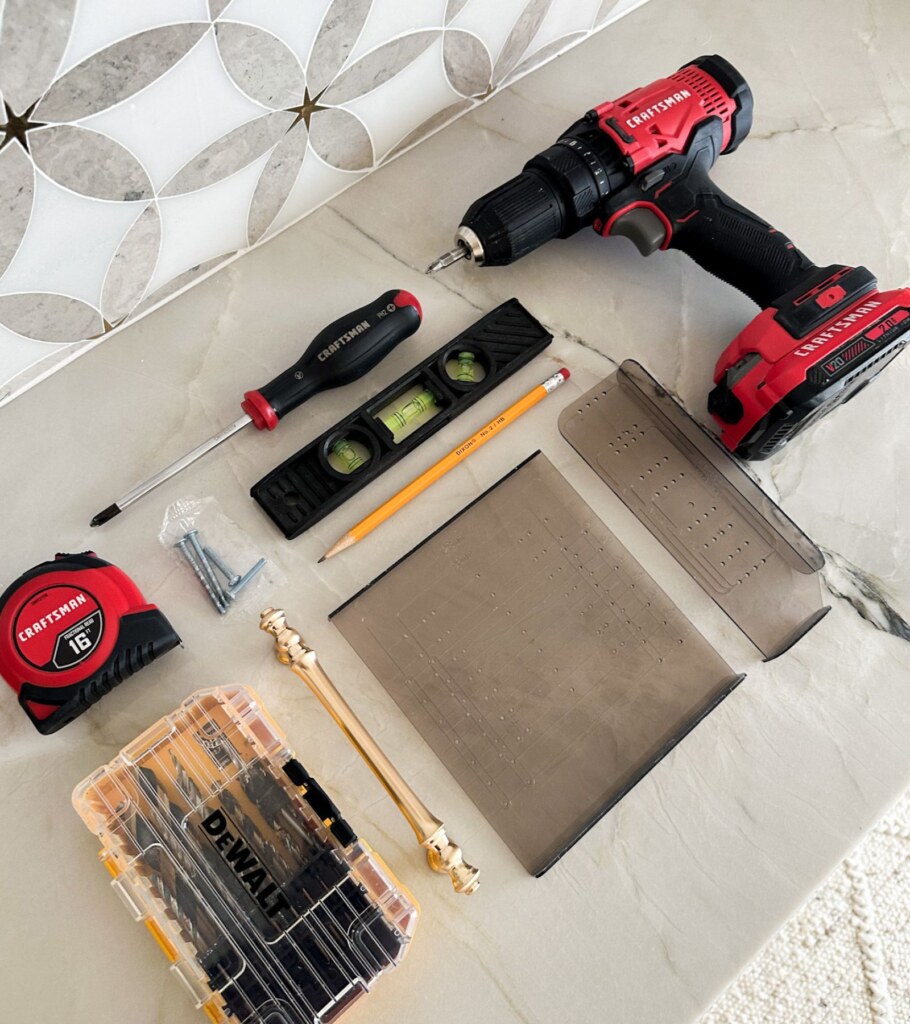
Things You’ll Need:
- Drill
- Drill bits
- Screwdriver
- Tape Measure
- Pencil
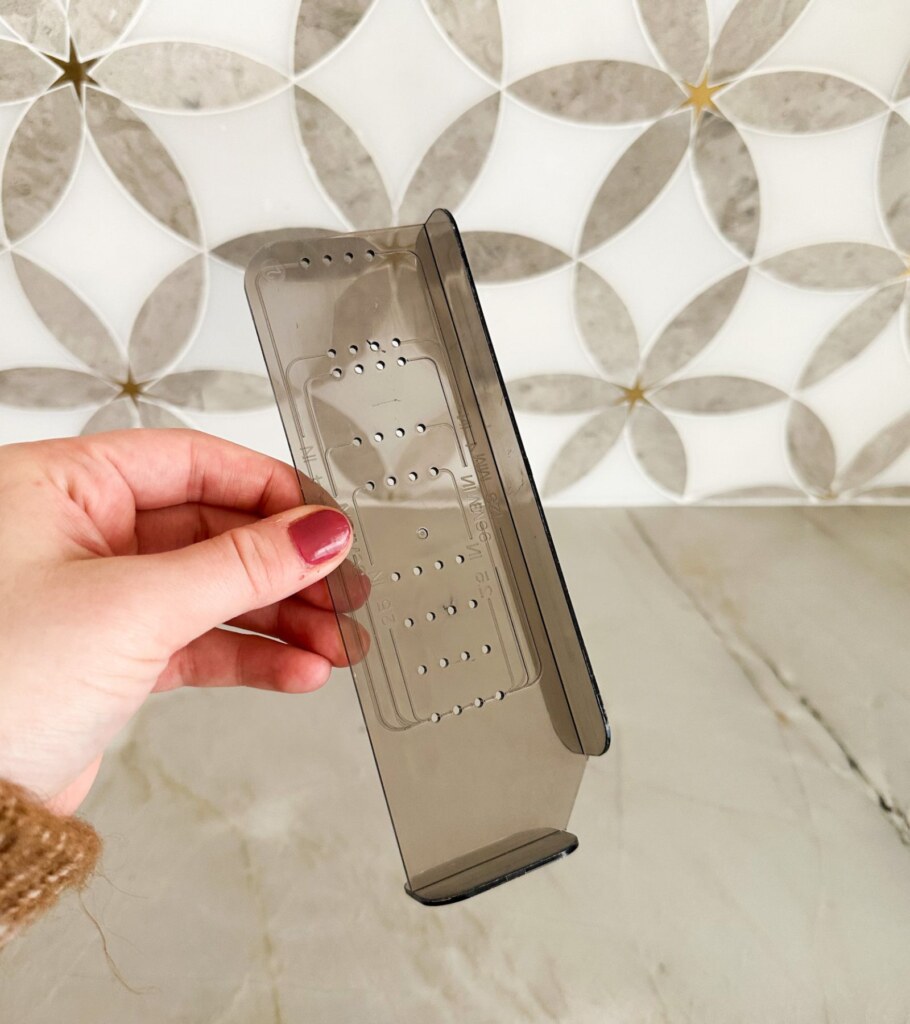
- Template (Made for 3”, 3.75”, and 5” pulls)
- Level (When not using a template)
I highly recommend using a template, but I’ll also be covering how to install cabinet pulls without a template later on.
Essentially a template makes this easy job even easier!
Keep in mind…
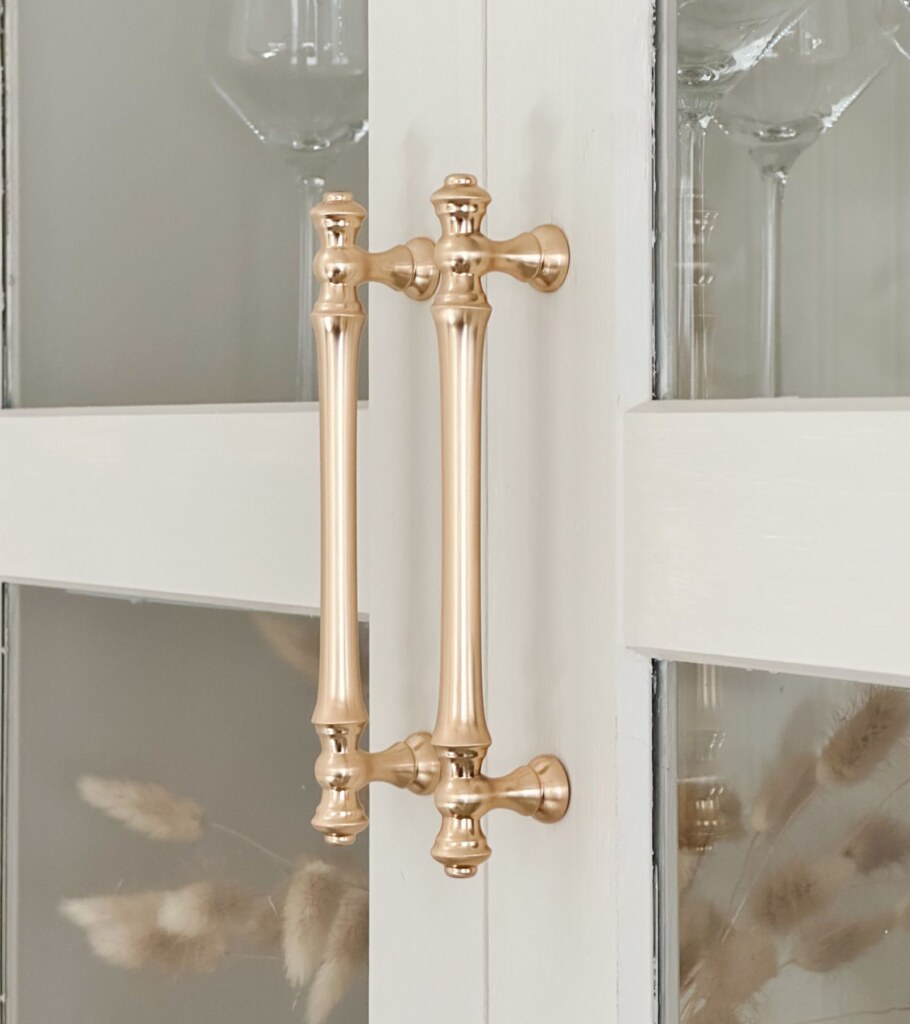
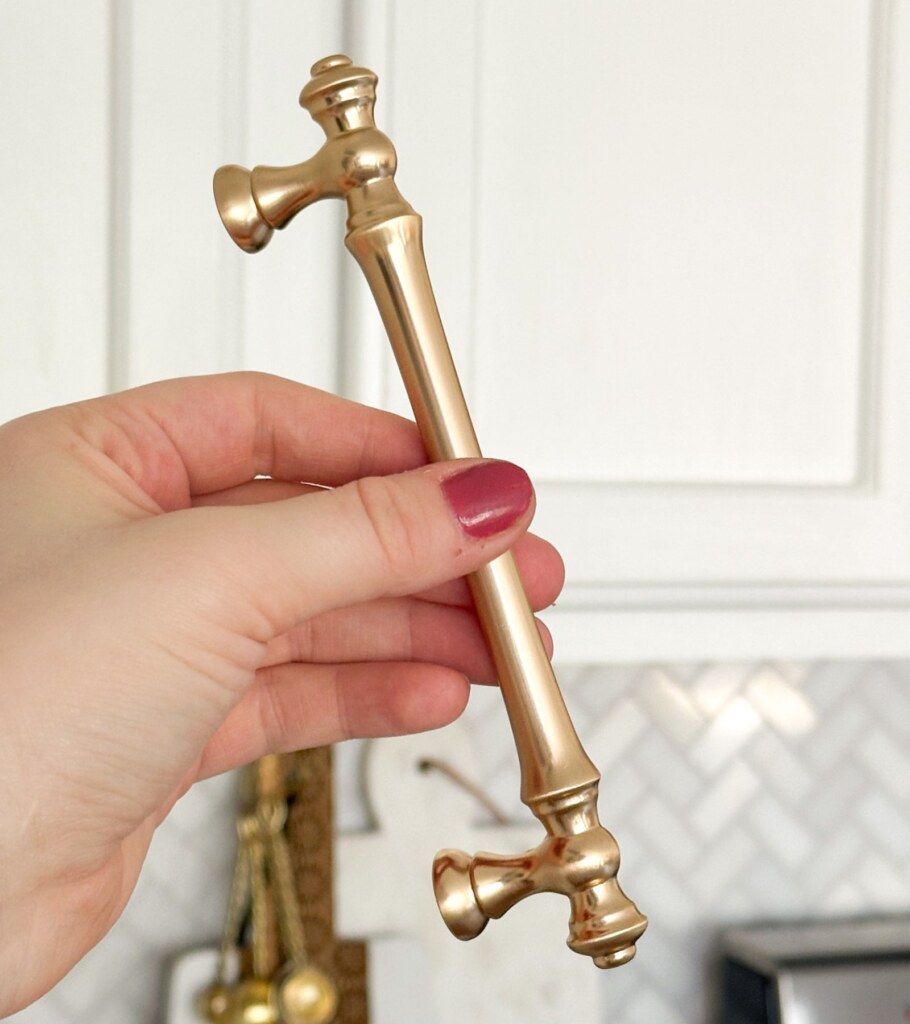
Cabinet pulls are measured from the hole center to the hole center – make sure you know this measurement. The overall length of the pull is going to be longer than the hole center measurement.
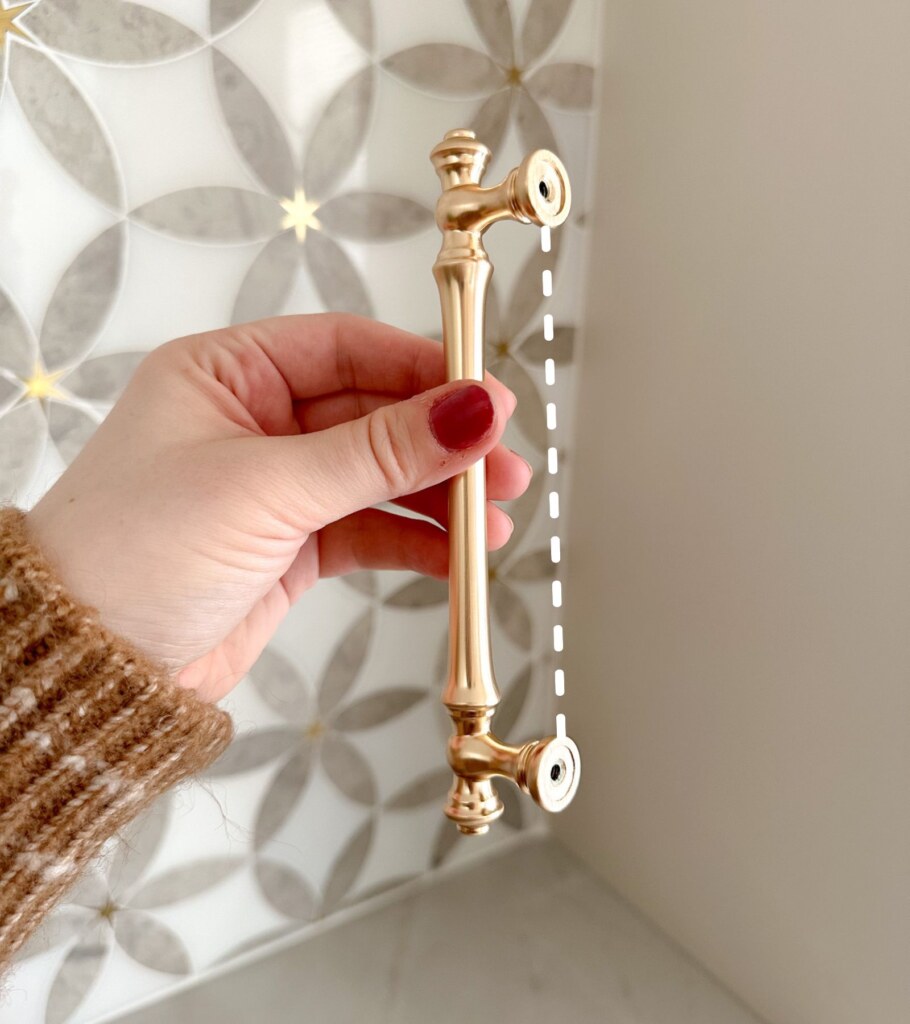
This is VERY important to keep in mind before installing!
Especially if you’re simply replacing cabinet hardware so you can buy the same size handle.
How to Install Cabinet Handles With a Template
Let’s dive into how to install cabinet handles on a door vs. on a drawer. There is a different process on how you approach each one. But regardless, if you have a template, it will make this process and your life 10x easier!
Installing Handles on Doors with a Template
1. Mark the holes with a pencil using your template
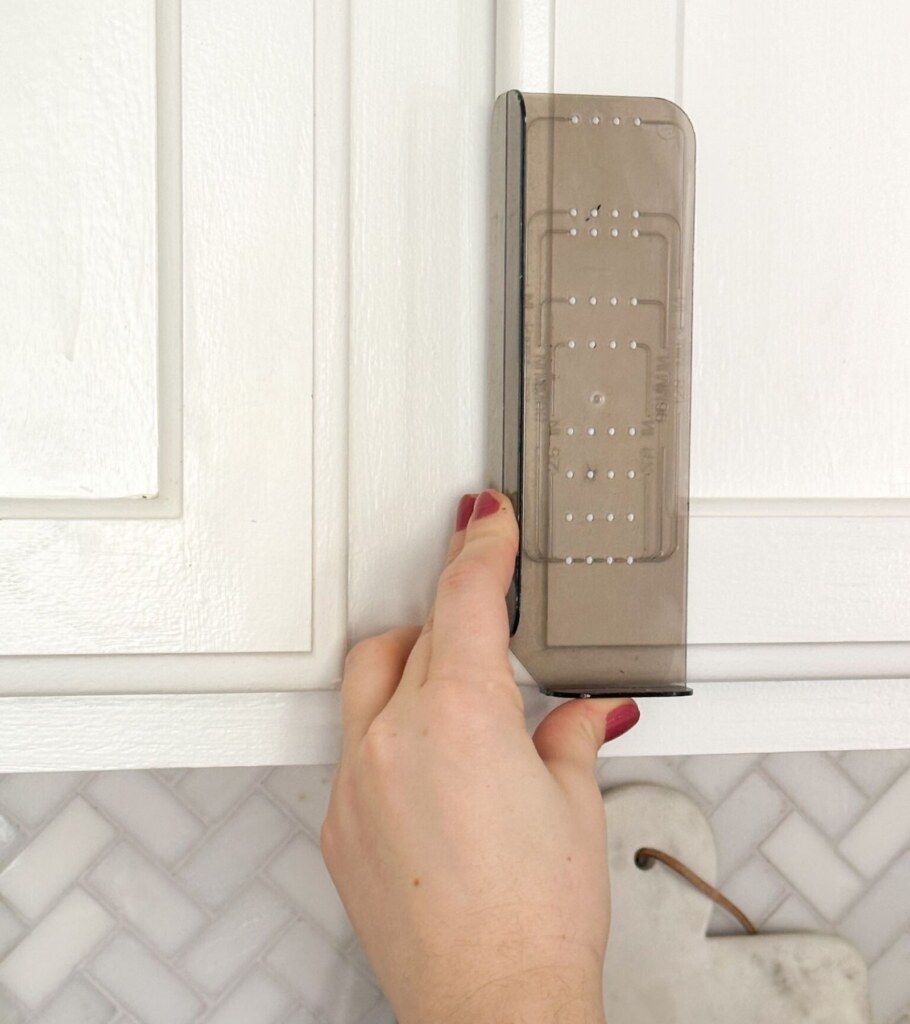
Put your cabinet door template up against the cabinet. This is the template that perfectly hugs the side and bottom of your cabinet door.
Triple-check the template to ensure you’re making your pencil marks at the correct distance for your pull size.
Use your pencil to fill in the appropriate circles and then set your template to the side.
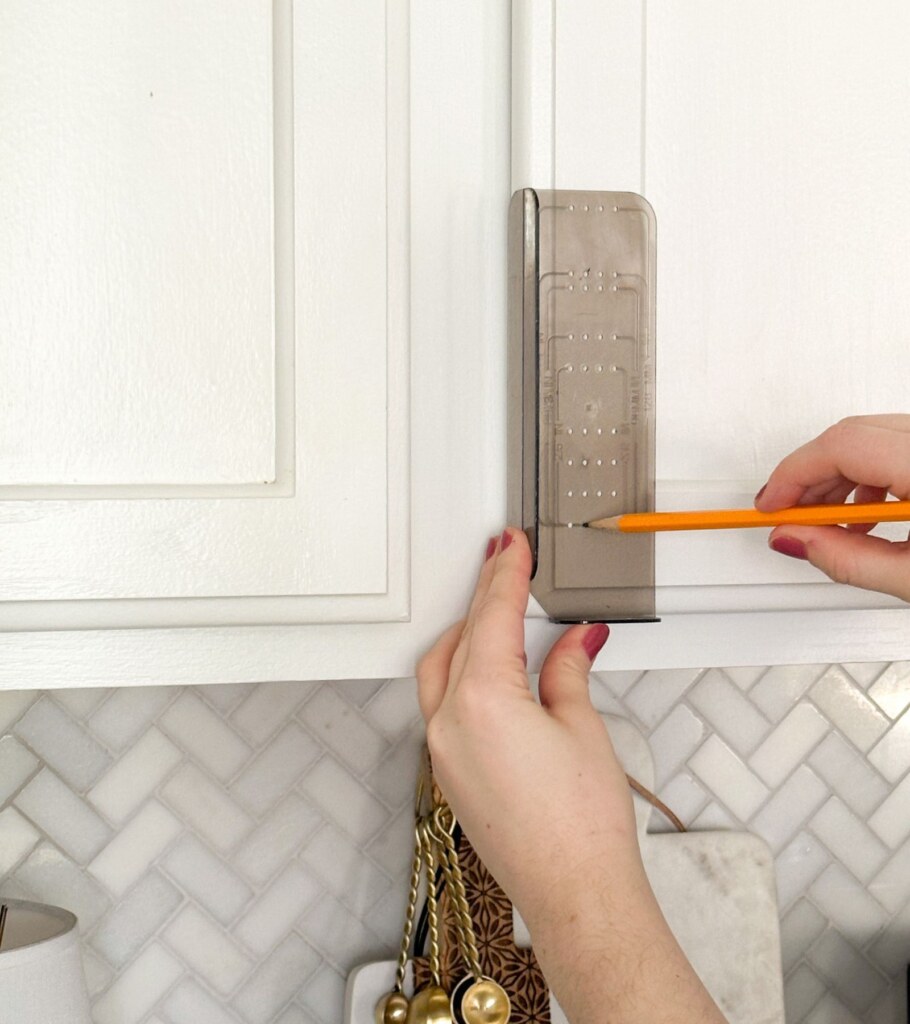
Which circles should you use? The ones that are the most centered on the vertical trim of your cabinet (known as the stile).
2. Dry fit your handle
Before we do any drilling, it’s so important to hold your handle up to the pencil marks you just made.
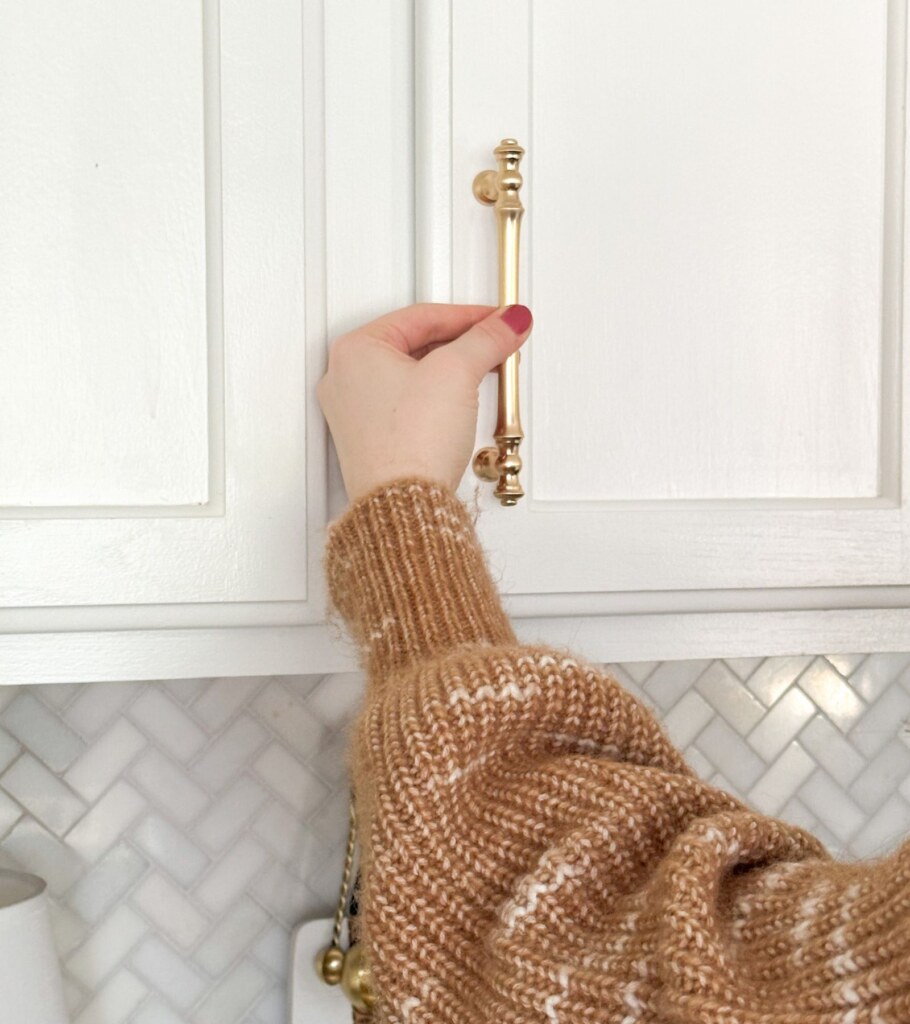
The holes in the cabinet pull should perfectly align with the pencil marks you just made.
Take a step back – ensure this placement looks good!
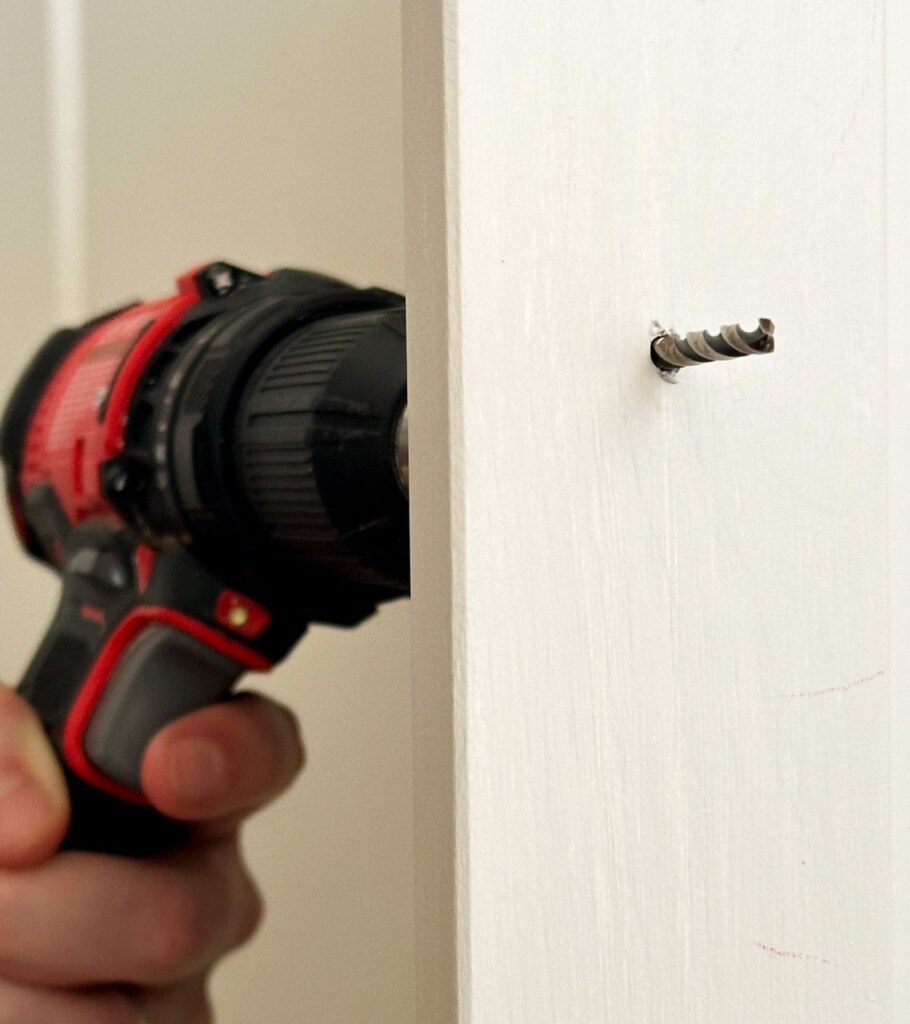
3. Drill the new holes
In this step, it’s important to use the right size drill bit. If your pulls don’t come with any guidance, use a drill bit that’s as wide as the screw minus the threads of the screw.

TIP: When you go to drill holes in the cabinets, you want to hold your drill as straight as possible.
Unfortunately, there’s not much wiggle room once the holes are drilled because the screws need to go into the back of the handles extremely straight.
Line your drill bit up with the pencil marks and begin drilling. Don’t push hard into the cabinet door, just enough pressure for the drill bit to move forward. If you push super hard with force, you risk the back of the hole splitting, which is not the look we’re going for here!
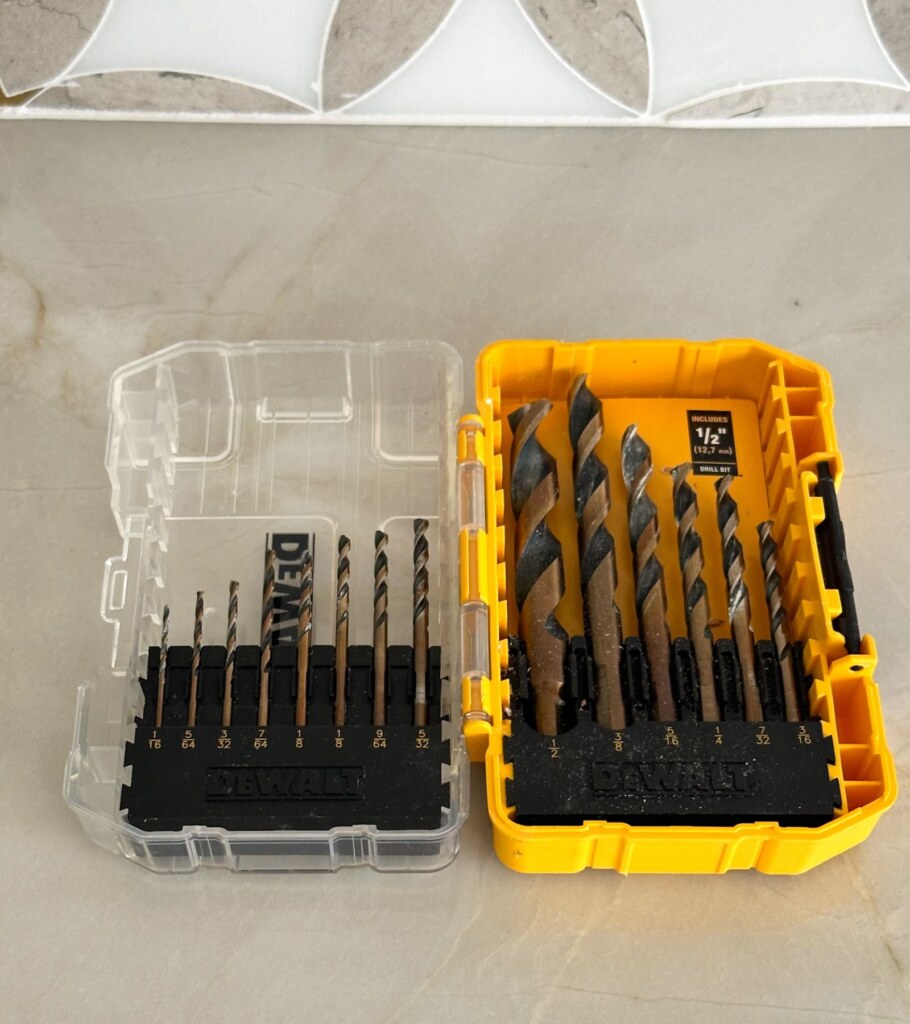
The best drill bits for cabinet hardware installation are these Dewalt drill bits. Realistically any drill bits are going to do, but this pack is too good and inexpensive to pass up. I use them on all of my projects!
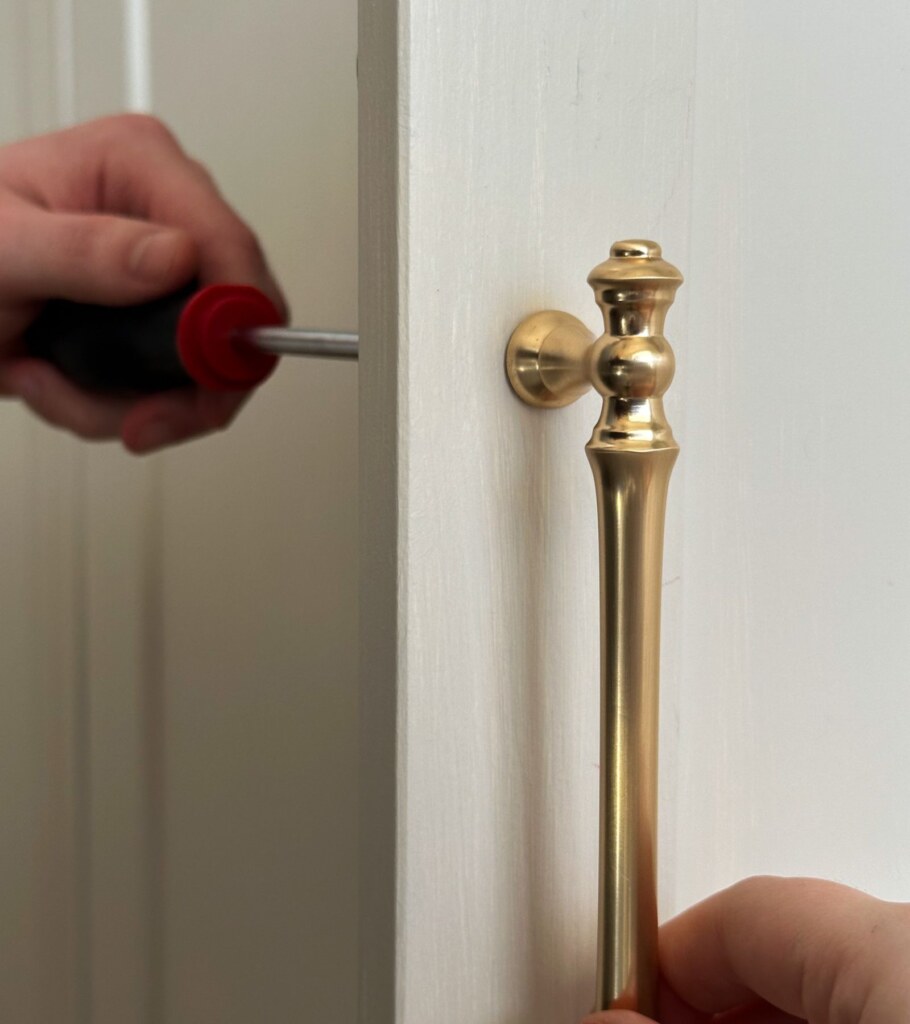
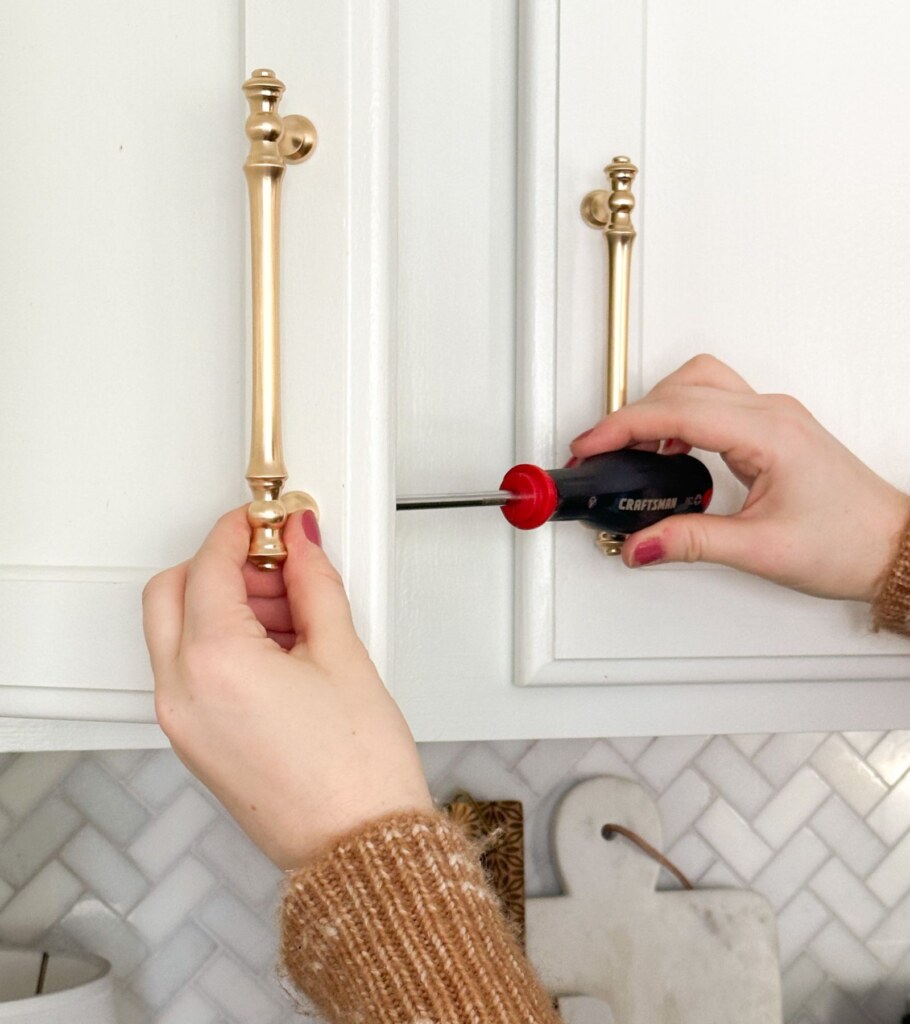
4. Use your screwdriver or drill to screw in your new cabinet pulls
Simply screw the screws into your new cabinet pull.
A lot of cabinet hardware comes with long screws that can be cut to the necessary length. Check out the section further down for the easiest way to cut screws!
Things are not lining up for me – what do I do?
If your screws are not going into your holes properly, make the holes on your cabinet bigger by using a drill bit one size up from the bit you originally used.
This will allow for a bit more wiggle room to get the screw perfectly lined up with the hole.
And that’s how to install cabinet handles on cabinet doors. Now let’s move to installing cabinet handles on drawers!
Installing Handles on Drawers with a Template
1. Measure and mark the center of the cabinet drawer
Using your tape measure, measure the width of your cabinet drawer. Divide the total width in half and lightly mark the center point on the drawer with a vertical line using your pencil.
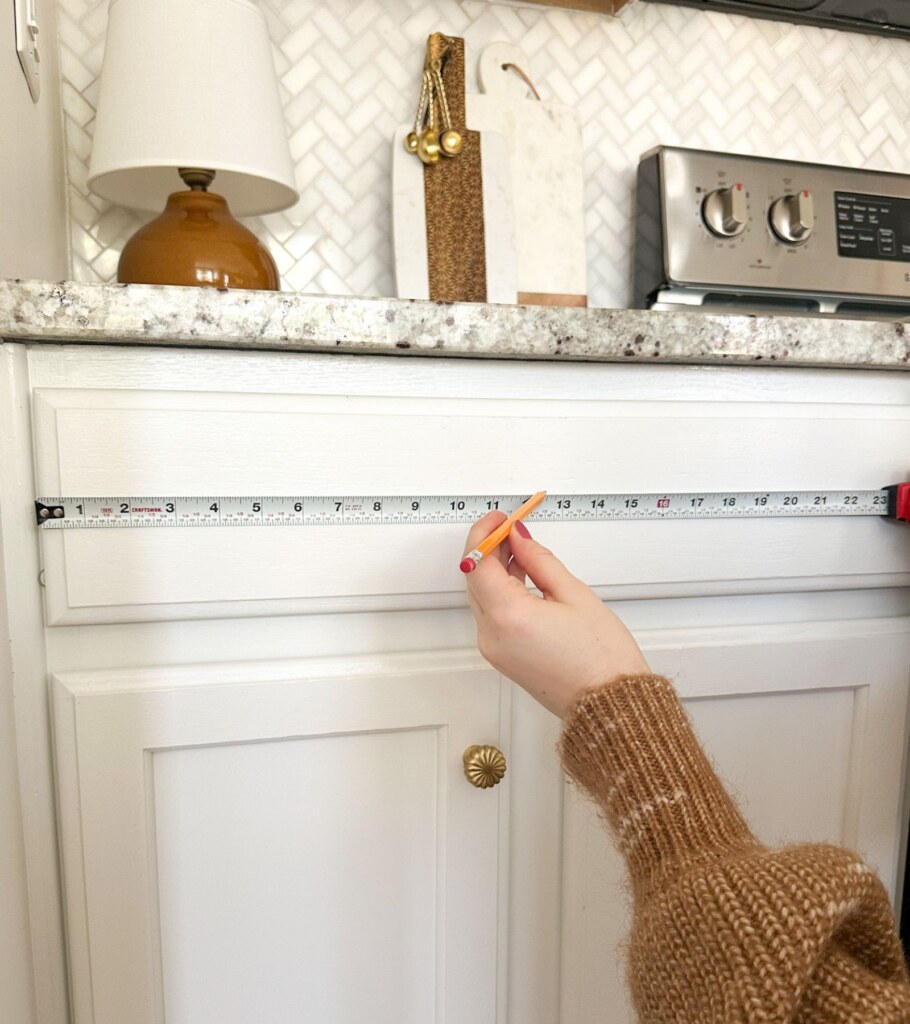
Then, use your tape measure to measure the height of your cabinet drawer. Again, divide the total height in half and lightly mark the center point on the drawer with a horizontal line with your pencil.
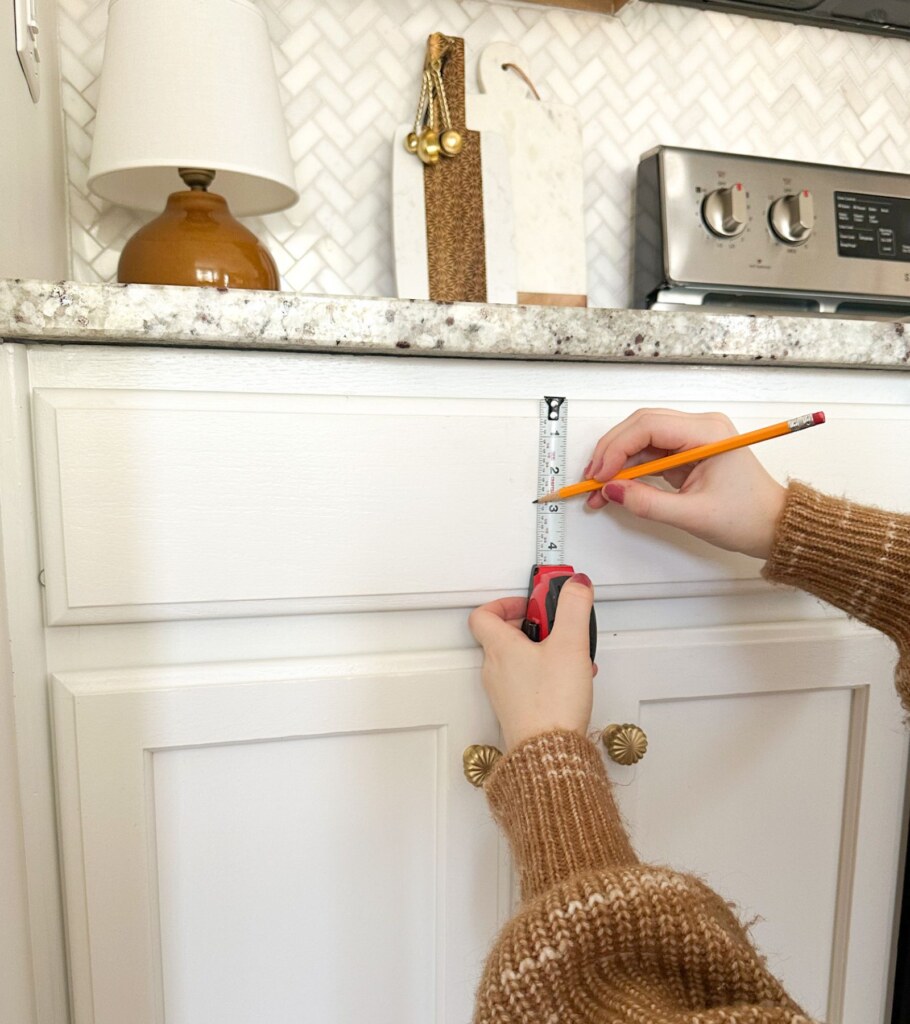
Don’t worry, you can erase these marks in the end. If you don’t want to mark directly onto your cabinets, use some painter’s tape!
2. Center the drawer template on the marks you made
Take your drawer template, which has the lip only on one side to sit on top of your drawer.

Center the template on the mark you made from Step 1, this way you know your handle is completely centered on the drawer.
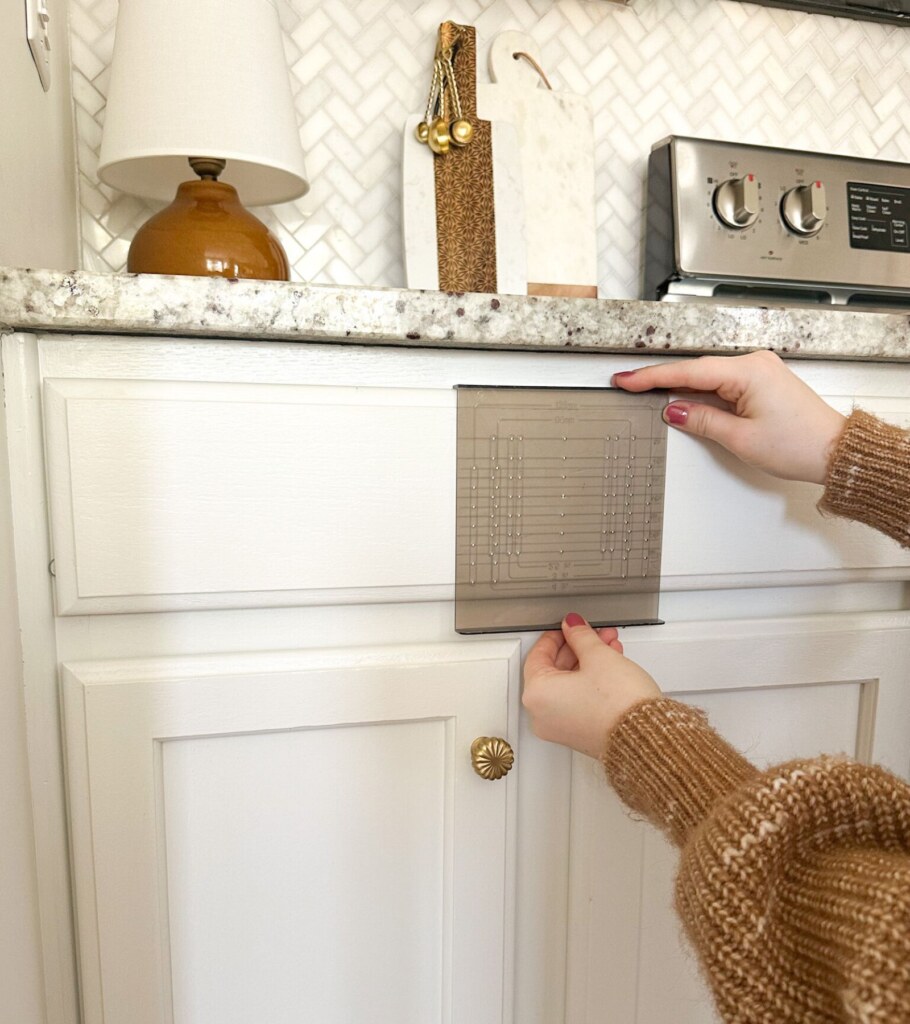
This should be relatively easy to do since the recommended template has a center hole – which is used for knobs. Just line it up with your mark!
Use your pencil to color in the holes that align with the size of your handle.
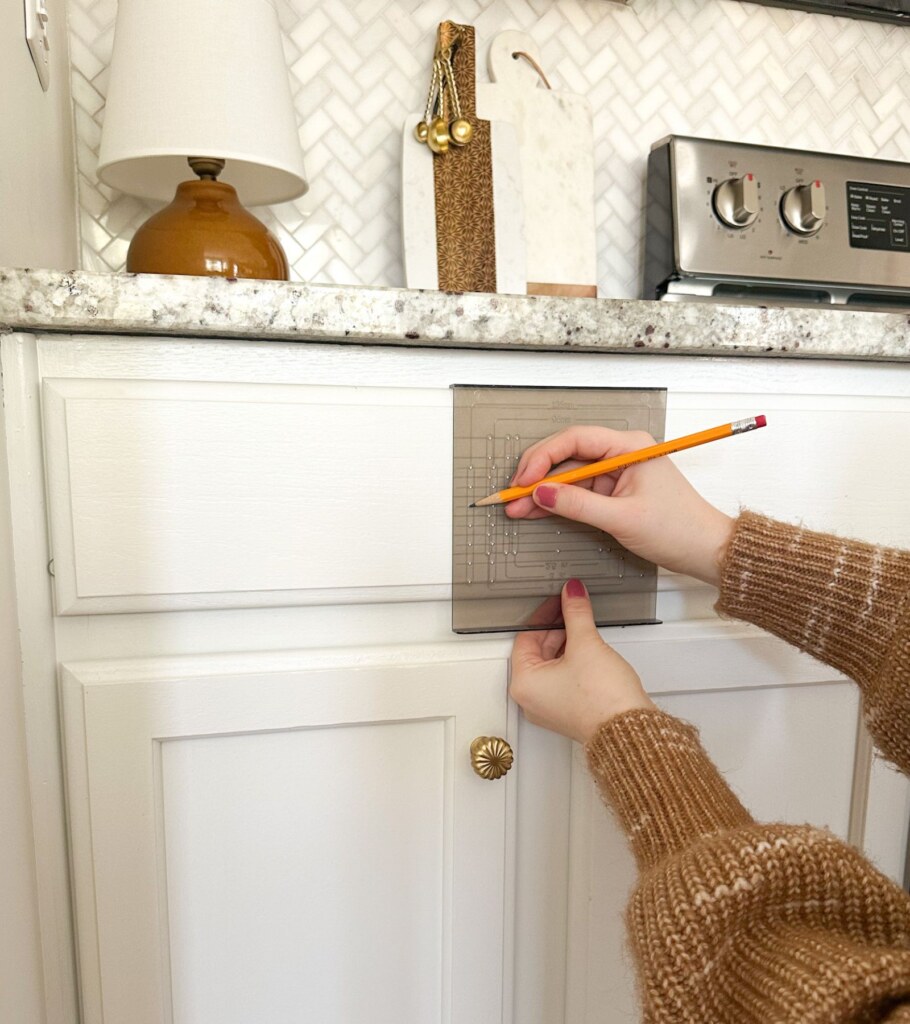
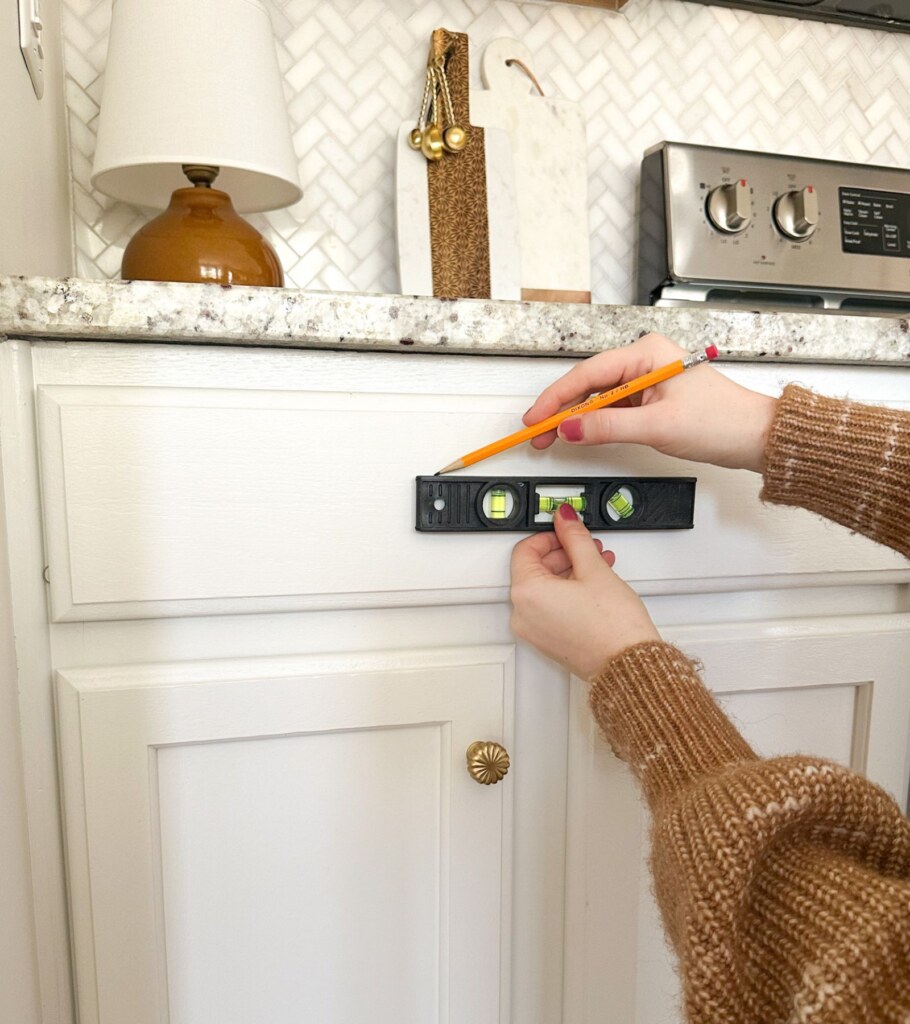
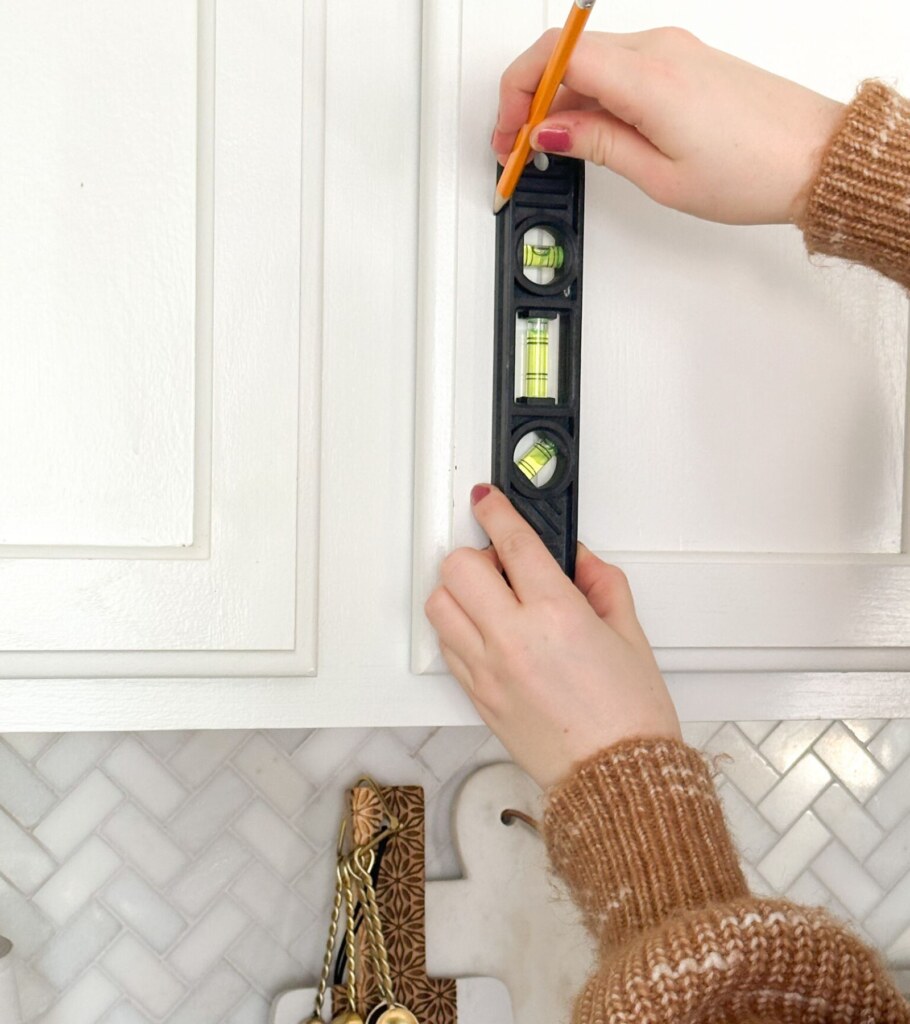
If you want to double-check that things are level, line up your small level with both marks. Chances are, these are going to be level since you used the template! But I personally always like to just double-check my work. 😉
Follow steps 2-5 from the above Installing handles on doors with a template section to complete installation!
How to Install Cabinet Handles Without a Template
This section is best for those installing longer cabinet pulls (longer than 5” from hole center to hole center). Since most templates do not account for pulls longer than 5”.
Installing Handles on Doors without a Template
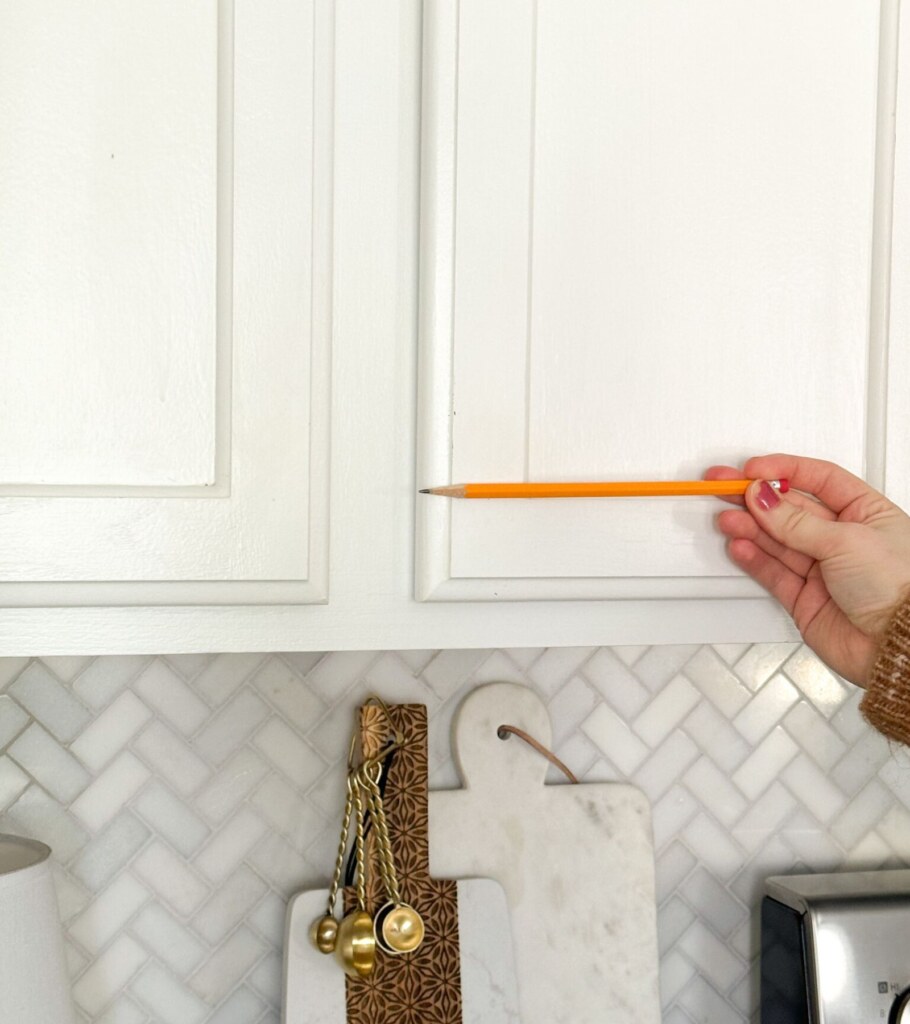
1. Determine handle placement
When installing cabinet handles without a template, this is super important to get right.
The general rule of thumb is to line up the bottom screw hole with the interior corner of the molding on the cabinet doors. But this is just a common way to do it, you can install the cabinet handle however you think is best for your particular door!
Hold your cabinet pull in place – does the bottom of the pull extend past the bottom of the door? If so, you’ll need to move the pull up until there’s at least an inch between the bottom of the pull and the bottom of the door.
Next, center your pull on the vertical cabinet door trim – also known as the stile. This will help you get a good visual before drilling holes for the cabinet pulls.
2. Mark the holes with a pencil
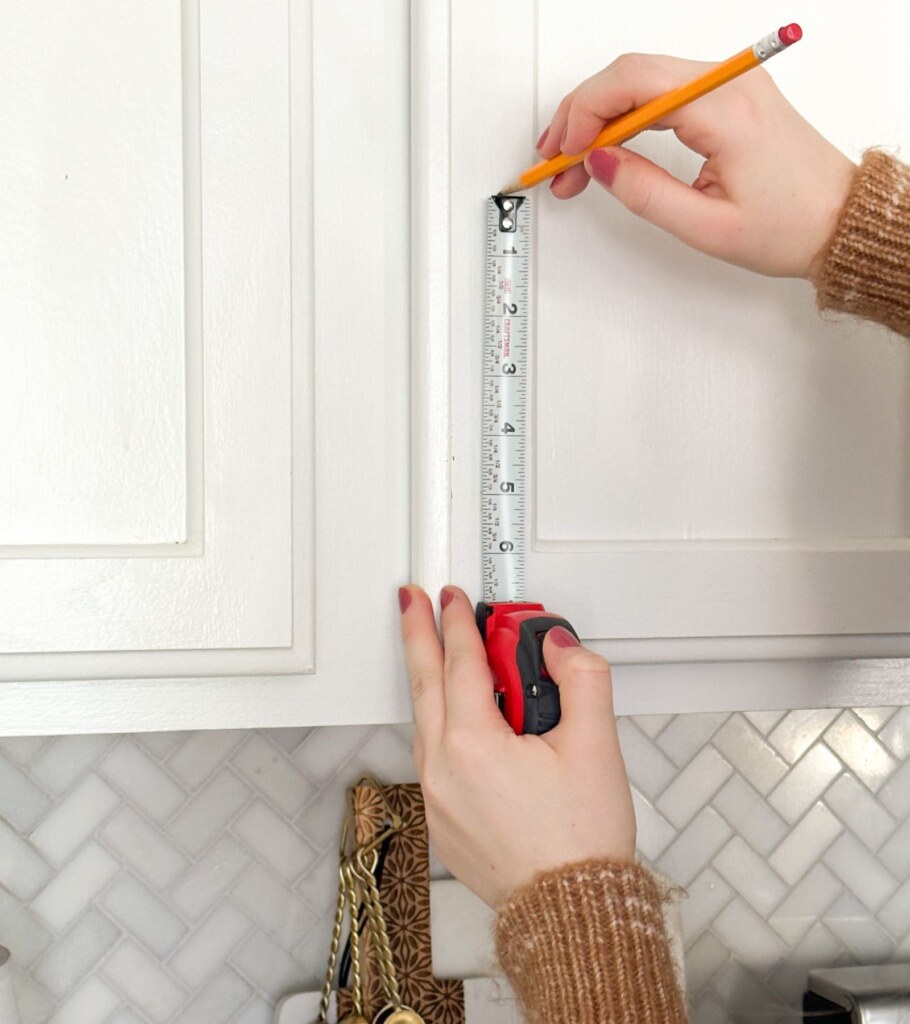
It’s easiest to get the exact placement of your pull, then set your pull to the side so you can use a tape measure for exact measurements.
It’s best to mark the bottom screw hole first. Or top if you’re working on the bottom kitchen cabinets.
First, draw a light horizontal line over from the corner of the cabinet molding. You will want to use a small level for this!

Then use your tape measure to find the width of the vertical molding (stile) and make a light vertical mark. This should give you a + sign so you know exactly where to drill your first hole.
Before drilling anything, we need to measure and mark the second hole for the cabinet pull. Remember, this measurement is from hole center to hole center.
Measure the distance from the first hole up the cabinet door to mark for the second hole. Make a light horizontal pencil mark relatively in the center of the vertical stile. You can extend this line a bit with your level.
For instance, if your pulls are 7.5” from center to center, measure 7.5” from your first mark and mark accordingly.
Now measure the width of the stile where you just made your horizontal line. Divide the width in half to get the center and make a vertical pencil mark.
At this point, you should have a + mark exactly where you’ll be drilling both holes for installing your new cabinet hardware.
Use your tape measure just to triple-check that the distance is perfect from hole center to hole center. Re-mark if needed!
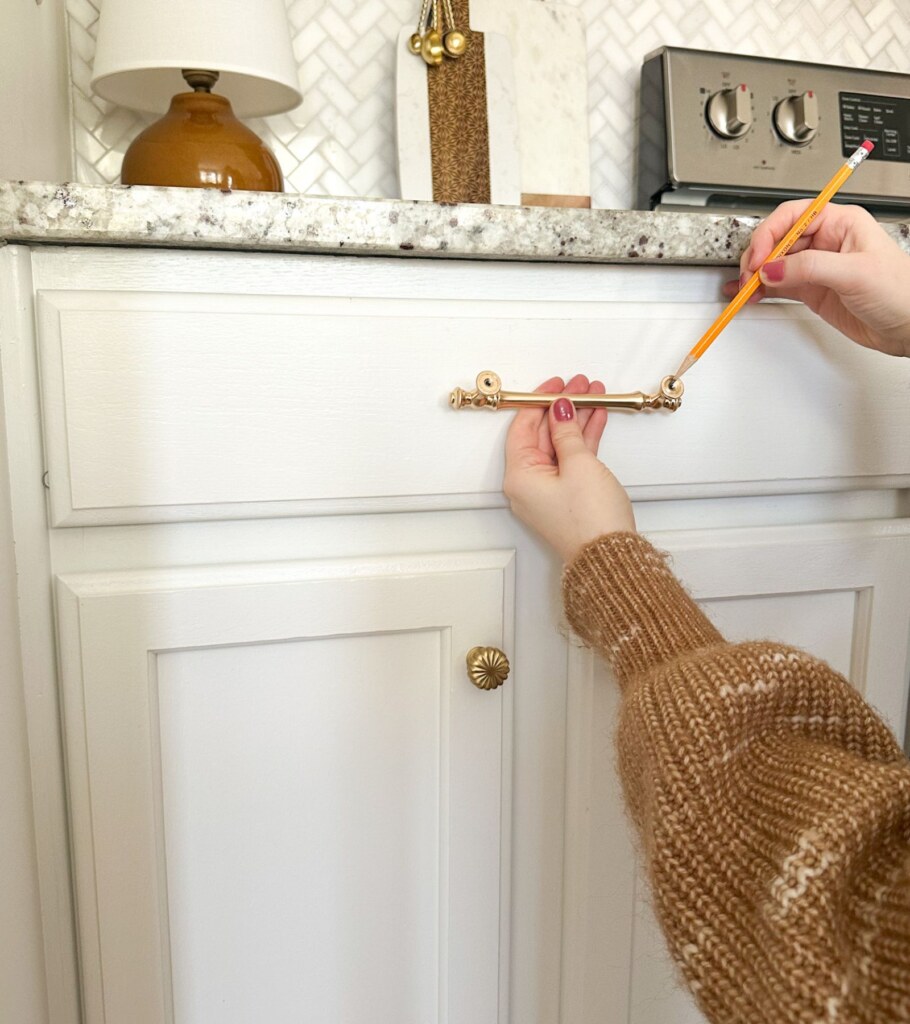
3. Dry fit your cabinet pulls
Before drilling into your cabinets, it’s soo important to ensure things look good.
Hold your cabinet pulls up to the pencil marks. The marks you made should perfectly align with the holes in the back of your cabinet pulls.
This is such an overlooked step when learning how to install cabinet handles. It’s always good to double-check your work, and that’s exactly what we’re doing here!
4. Drill your new holes
Holding your drill as straight as possible, use the appropriately sized drill bit to drill your new holes for your cabinet pulls.
Remember, the best drill bit size is one where the drill bit is as wide as the screw minus the threads around the screw.
Don’t push too hard when drilling the holes to avoid splitting the back of the hole.
5. Use a screwdriver or drill to install new cabinet hardware
Simply screw in your cabinet hardware.
If you happen to run into an issue where things just aren’t seeming to go in – I’ve been there, done that – don’t freak out!
Simply use a drill bit one size bigger than what you used before. Make the original hole bigger. This will give you a bit more wiggle room to get the screws straight and able to go into the pull correctly.
If you need to know how to cut screws for cabinet handles, check out the section further down the post.
And that’s it for how to install cabinet handles without a template for cabinet doors, let’s dive into cabinet drawers now!
Installing Handles on Drawers without a Template
1. Determine cabinet handle placement
Installing cabinet handles on a drawer is all about getting things centered.
Use your tape measure to find the width of the cabinet drawer. Divide the total width in half to find the center. Make a small faint vertical line with a pencil.
Use your tape measure to find the height of the cabinet drawer. Divide the total width in half to find the center. Make a faint horizontal line with a pencil.
You should now have a + pencil mark that indicates the dead center on the cabinet.
2. Mark the holes with a pencil
Here’s where some math comes in! Take your cabinet pull measurement (hole center to hole center), and divide it by two. For example, a 7.5” handle length divided in half would be 3.75”. Remember this “new” number!
From your vertical center line, mark your “new” number to the left and right of that line. Using the example from before, you’d mark 3.75” to the left of the line and 3.75″ to the right of the line.

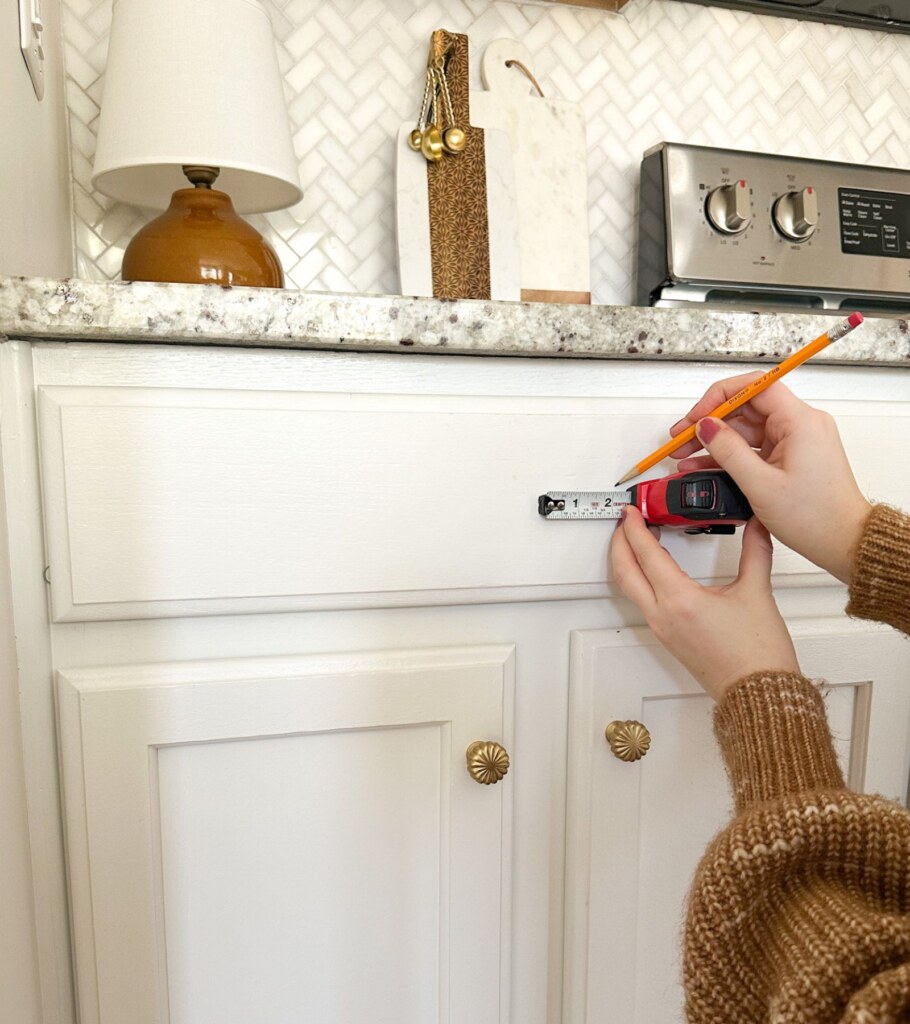
Extend the horizontal line across your cabinet so it meets your two new pencil marks. You should now have two + pencil marks for where each of the holes needs to be drilled.
Follow steps 3-5 from the above Installing handles on Doors Without a Template section to complete installation!
How to Install Cabinet Knobs
When thinking about installing new cabinet hardware, knobs are the absolute easiest to tackle.
So easy we don’t even need a step-by-step – I’m just going to give you a few pointers.
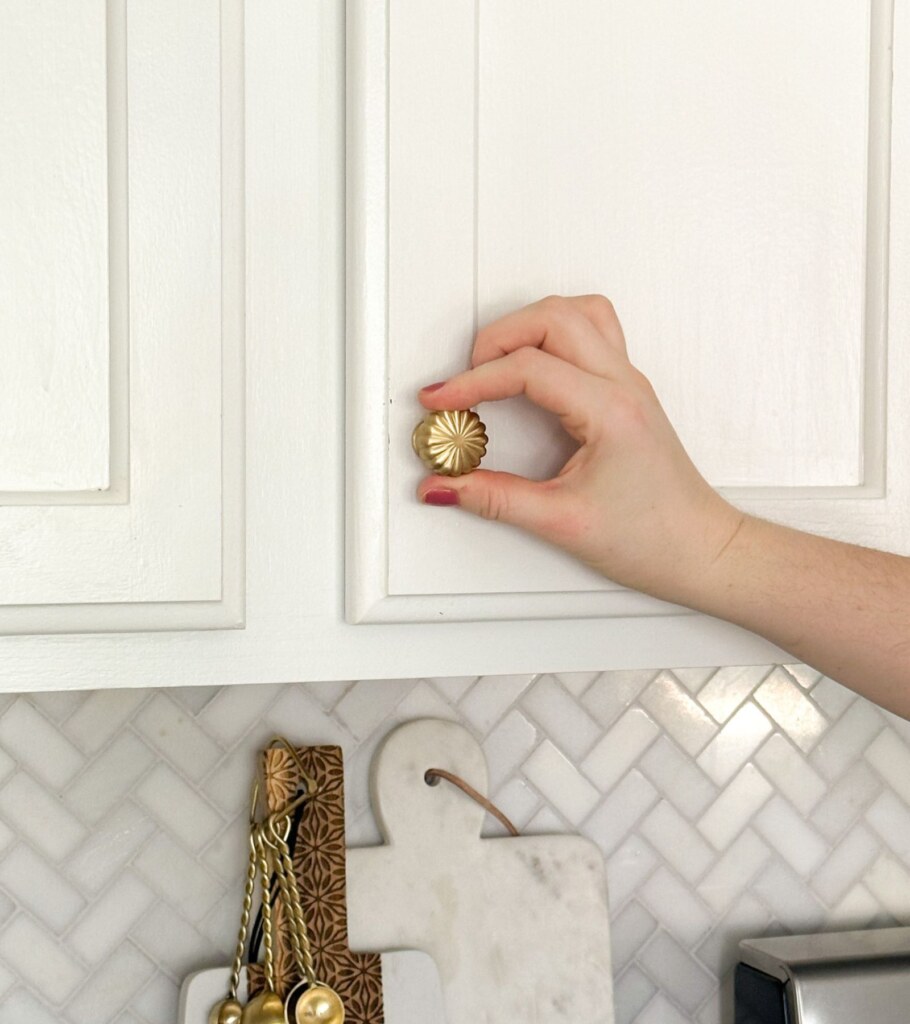
- For cabinet doors, cabinet knobs should be in line with the interior corner. Aka the inside of where the vertical (stile) and horizontal (rail) trim come together. But this is just a guide and you can place the knobs wherever you feel makes the most sense for your cabinets.
- Cabinet knobs should be centered on the vertical cabinet door stile.
- As a general rule of thumb, knobs should be 2 ½” to 3” up from the bottom of the door (or top, if you’re installing on bottom cabinets).
- When installing a knob on a drawer, the knob should be centered both vertically and horizontally. Grab your tape measure, find the absolute center of your drawer (horizontally and vertically), make your marks, and drill your hole! Simple as that!
- If you’re replacing cabinet handles with knobs, you’ll have some holes to fill. Check out the below section on how to do this!
How to Fill Screw Holes in Cabinet Doors and Drawers
When you need to fill some screw holes in cabinet doors or drawers, it’s actually a very simple process.
The most important thing is having the cabinet paint color on hand. If you don’t, then I recommend sticking with the same style of pull that’s currently there (whether it be handles or knobs). Don’t worry, you can make it 10x cuter by upgrading your cabinet hardware!
Check out my post on the 28 of the cutest cabinet hardware that Amazon has to offer.
If you have the cabinet paint color, then you can keep going with these steps!
1. Sand down the current holes
After removing the existing cabinet handles and pulls, use 120-grit sandpaper and lightly sand down the front and back of the hole. Sometimes this step is not needed if the original holes are already smooth.
2. Fill the holes with paintable wood filler
I highly recommend Gorilla Wood Filler because it’s SO easy to work with – and I’ve worked with a lot of wood fillers lol. Plus it’s paintable – which is absolutely essential.
Roll a small ball of wood filler between your fingers, and push into the hole. Use your finger to smooth out the wood filler. Don’t forget the back of the door!
Just ensure to smooth out the wood filler so there’s not a big glob there. At the same time, you want enough to where it’s slightly raised up and completely filling the hole.
3. Sand down wood filler
Once the wood filler is completely dry – follow the product instructions and touch to make sure – use your 120-grit sandpaper and very lightly sand down the excess wood filler.
At the end of this step, your wood filler should be completely level with your cabinet door or drawer. That way when you paint over it, it’ll be as if there was never a hole there.
If you need to do some patchwork and add a bit more wood filler, that’s totally fine!
Once the wood filler is completely dry, use a lightly dampened paper towel to wipe off any wood filler crumbs or dust. It’s important to use as little water as possible because you don’t want it to remove any of the work you just perfected!
4. Paint over the wood filler
Finally, using your cabinet paint, start painting over the wood filler on both sides of the door.
Be sure not to use long brush strokes as your cabinet is most likely protected by a clear top coat.
To protect your work, you can use Polycrylic by Minwax – this is what I used when I converted my kitchen cabinets from oak to white. Just make sure you use a similar sheen to what is currently protecting your cabinets.
Clear Satin is a good option for minimal shine without being too flat.
RELATED POST: 9 Simple Small Kitchen Remodel Ideas on a Budget
How to Cut Screws for Cabinet Handles
A lot of new cabinet hardware comes with screws that can be cut to the perfect length for your specific cabinets. That explains why the screw is so long!
This is sooo easy to do and I wish someone told me this the very first time that I went to try and cut one of these screws lol.
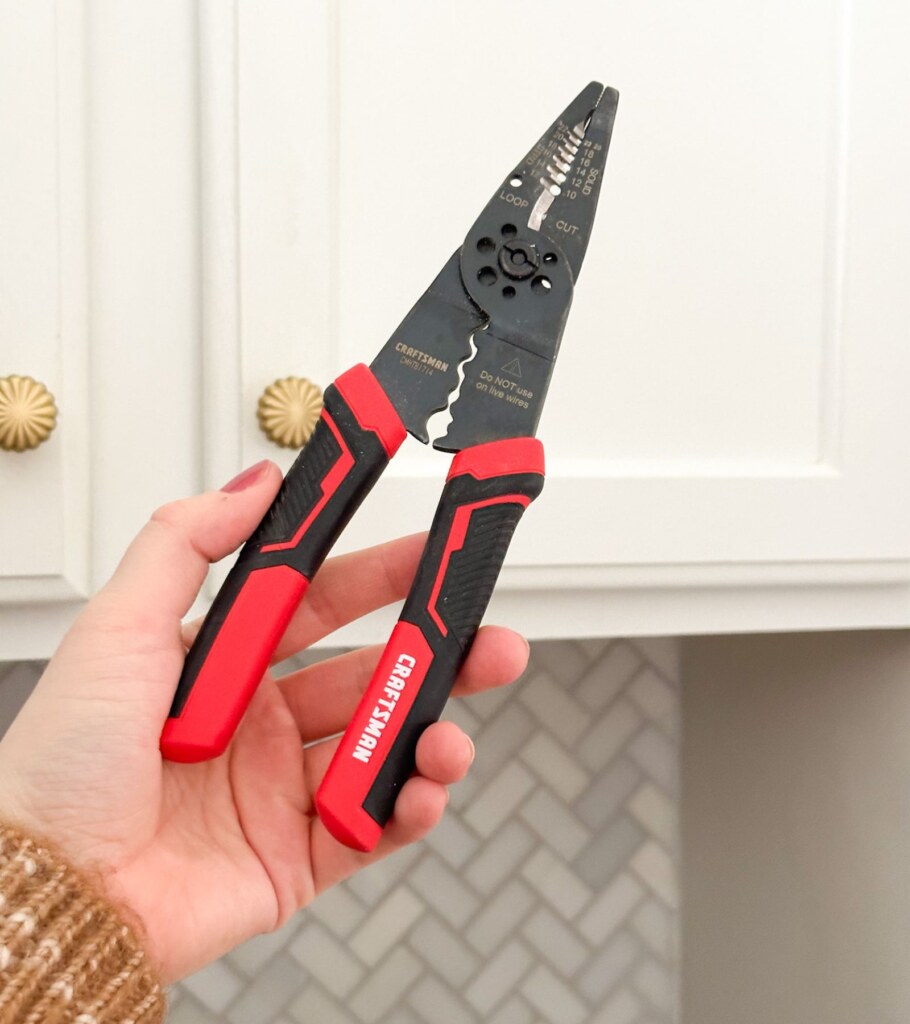
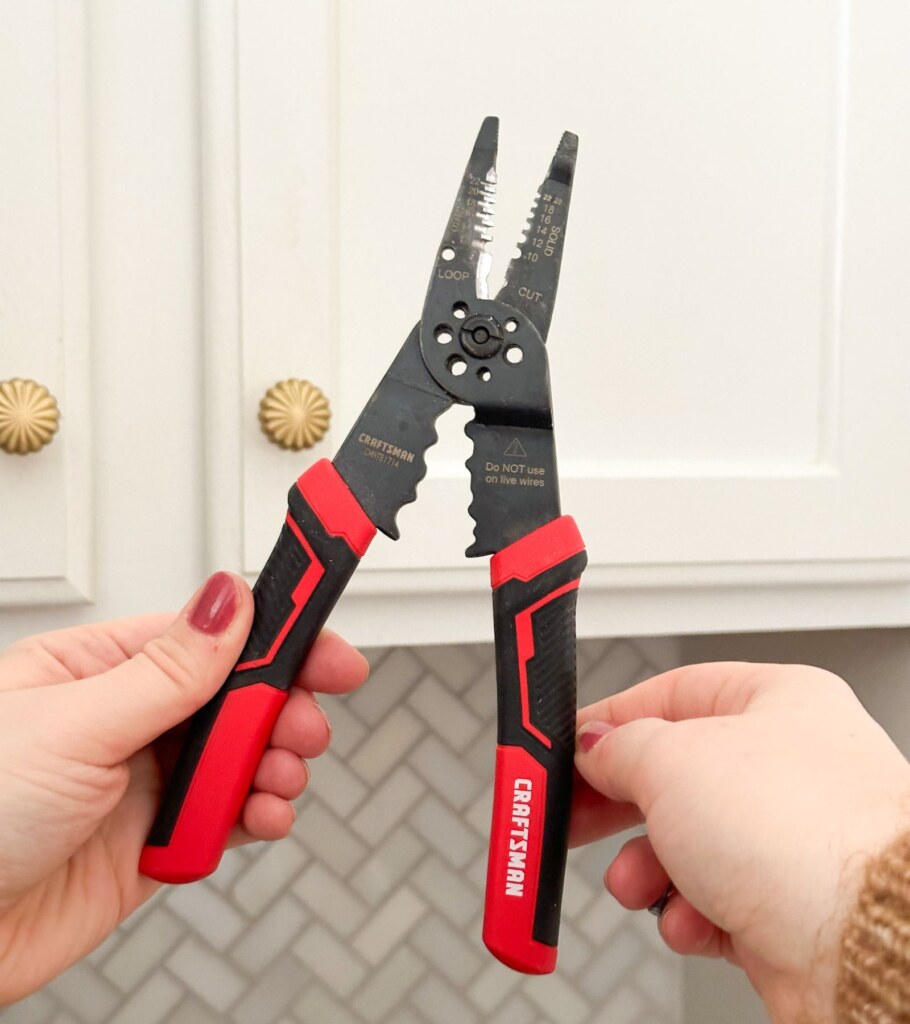
You NEED a wire cutter – but don’t stop there. You also need to use it correctly.
This tool is all you need to cut those screws down. Look at the section that surrounds the pivot point of the tool.
You’ll most likely see 5-40, 10-24, 4-40, etc.
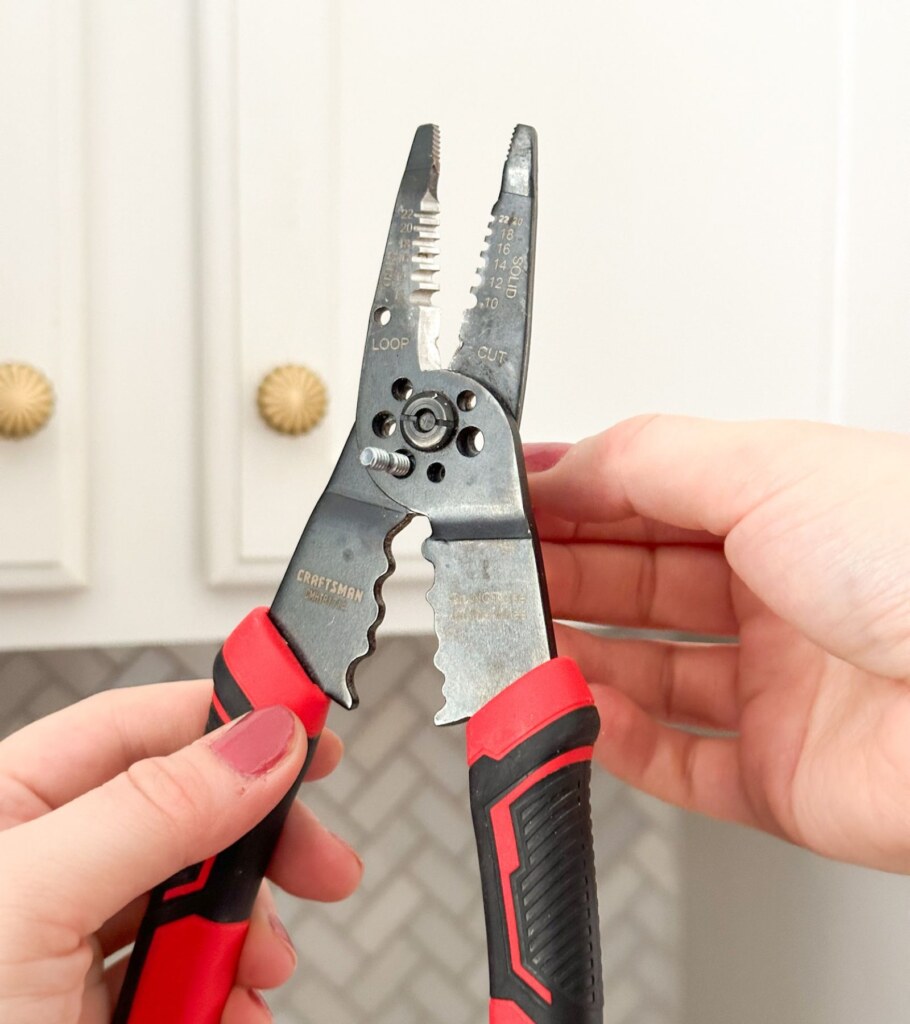
All you need to do is slightly open up the tool so that the holes align for you to stick a screw through.
The correct hole to use is one where you will actually need to screw your screw into it – it shouldn’t just go through loosey-goosey.
Screw your screw in enough so that the point that you want to cut is lined up with the tool. Usually, there’s an unthreaded portion of the screw.
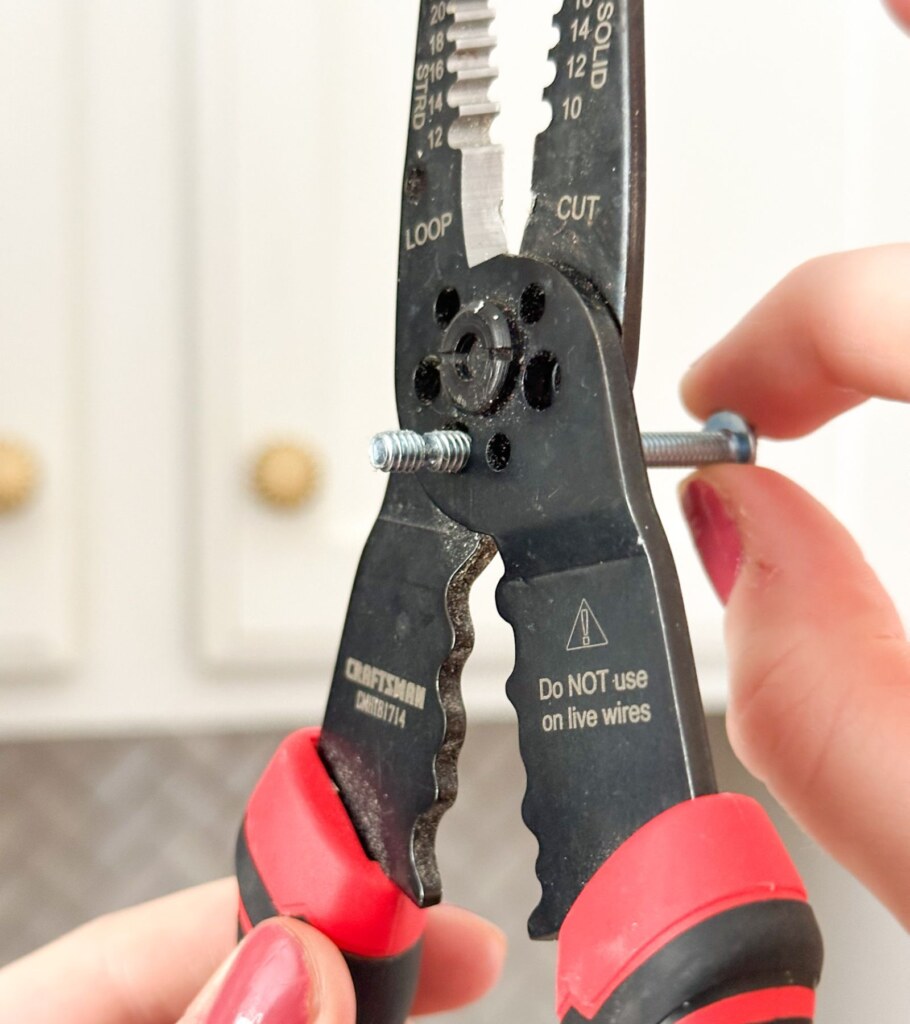
Now carefully squeeze the tool together. You may need to slowly chip away – squeezing and unsqueezing. But trust me, it will eventually cut through the screw and give you a nice clean cut to be used for your new cabinet hardware installation!
Watch your hand placement – keep all hands and fingers on the outside of the grip at all times. 😊
If you aren’t sure how much to take off the top, it’s always best to play it safe and start with less. You can take more off, you can’t put it back on once it’s off.
And that’s a lesson on how to cut screws for your cabinet handles!
Time for a beautiful cabinet upgrade – now you know how to install cabinet handles and knobs!
Installing or replacing new cabinet hardware is SO easy. You don’t need to pay someone to do it for you – I believe in you! As long as you have a few must-have tools for DIYers, you’ve got this.
It will be well worth the process once you take a step back and see all of those shiny new cabinet pulls!
And now you know how to install cabinet handles and knobs to make your kitchen, bathroom, or any other piece of furniture look STUNNING!


Leave a Reply