The below post may contain affiliate links. This means we will receive a commission if you purchase through our link, with no extra cost to you. As an Amazon Associate we earn from qualifying purchases. Read our full disclaimer.

If you love the classic charm of beadboard but don’t want to deal with the cost and hassle of real wood paneling, paintable beadboard wallpaper will be a total game-changer for you!
It gives you that same cozy, textured look but is way more budget-friendly, lightweight, and SUPER easy to install. Plus, since it’s paintable, you can customize it to fit your space perfectly!
Beadboard wallpaper works almost anywhere—on walls, ceilings, kitchen islands, cabinets, and even furniture. It’s a simple DIY upgrade that can make a huge impact. This step-by-step guide will walk you through exactly how to install it, from prepping your walls to painting the final coat.

Materials & Tools Needed:
- Paintable beadboard wallpaper
- Flexible smoothing tool
- Felt smoothing tool
- Seam roller
- Box cutter
- Tape measure
- Level
- Pencil
- Wallpaper primer
- Paint (We used Warm Putty by Valspar)
- Paintbrush, paint roller, and tray
Optional but helpful: A wallpaper toolkit ensures you have everything you need in one purchase.
How To Install Paintable Beadboard Wallpaper
1. Prepare Your Surface
A little prep work goes a long way in making sure your wallpaper sticks properly and looks seamless.
- Clean the walls – Dust, grease, and grime can prevent wallpaper from sticking, so wipe everything down with a damp cloth or cleaner.
- Patch any holes or cracks – If your wall has imperfections, fill them with spackle and sand for the best results.
- Remove baseboards and trim – If you are installing this wallpaper on a wall, you will want to remove any trim or baseboards before applying. I was installing the paintable beadboard wallpaper on the inside of my DIY built-in cabinets, so I didn’t have to do much at this point!
If your walls have a heavy texture, you might want to apply a thin skim coat of joint compound to smooth them out before wallpapering. Otherwise, the texture might show through!
2. Apply Wallpaper Primer

This step is optional but highly recommended! Wallpaper primer helps the wallpaper stick better, prevents peeling over time, and makes removal easier if you ever decide to take it down at a later point.
- Choose the right primer – A wallpaper-specific primer like Zinsser Shieldz or Roman PRO-977 works best.
- Use a paint roller to apply an even coat over the entire area where you’ll be installing the wallpaper.
- Let it dry completely (usually around 2 hours) before moving on to the next step.
3. Measure & Cut the Wallpaper

Now it’s time to cut your wallpaper into strips that fit your wall height.
- Measure from top to bottom and add a couple of extra inches to give yourself some wiggle room. You can always trim the excess later with a box cutter!
- Use a level to mark a vertical guideline (a “plumb line”) where your first strip will go. This helps ensure everything stays straight—because even the slightest tilt will make your seams look off.
- Match the pattern. Some beadboard wallpapers have distinct grooves, so make sure the lines match up between strips. The beadboard wallpaper I used does have those textured lines that need to line up in a certain way so if you use the same one, just keep that in mind.

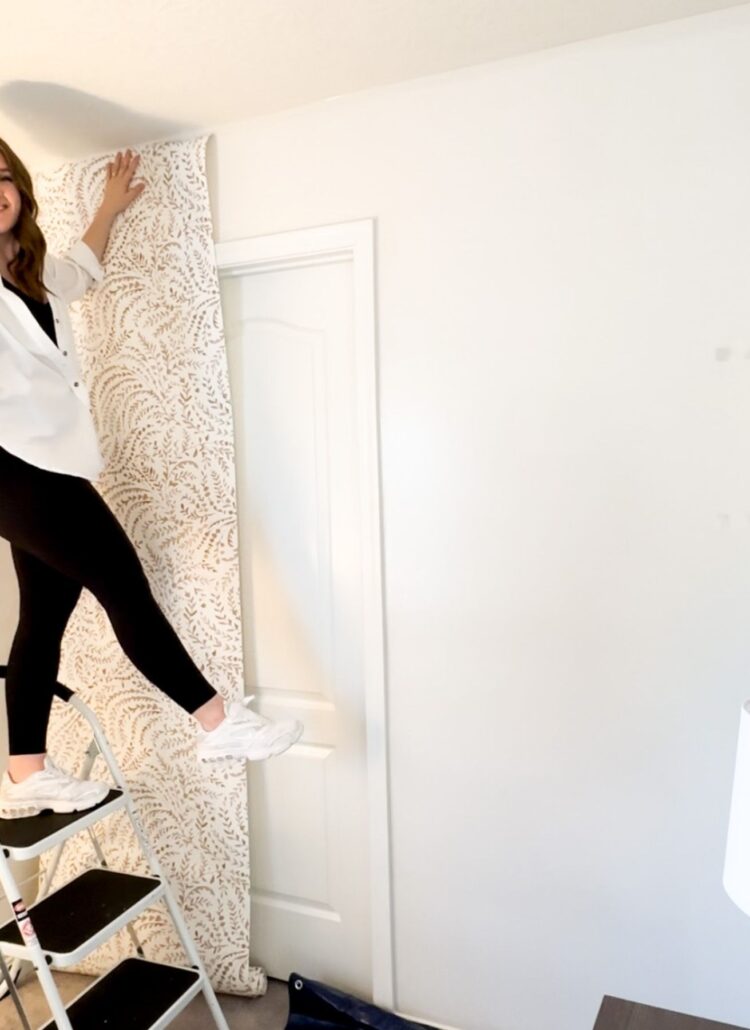
4. Apply the Wallpaper
This is where the magic happens! 🎉

For The Pre-Pasted Wallpaper:
- Activate the adhesive by submerging the wallpaper strip in water (following the manufacturer’s instructions). Note that the wallpaper is 24” wide so it should fit in a large sink or bathtub for the submerging process. I was able to fit it into our sink, luckily! This process was a little stressful! In hindsight, I think soaking it with a spray bottle would have also worked just as well!
- Let the water run off completely.
- “Book” the wallpaper by folding it paste-side-to-paste-side for a few minutes on the floor. This allows the glue to activate evenly. (see image below)
- Carefully position it on the wall, lining it up with your vertical “plumb” guideline.

If Using Unpasted Wallpaper:
- Apply wallpaper paste to the back of the strip using a roller or brush, making sure it’s evenly coated.
- Let it sit for a few minutes, then place it on the wall.
Smoothing the Wallpaper:

- Start from the center and smooth outward using a wallpaper smoother to remove air bubbles.
- Use a seam roller along the edges to press them down and prevent lifting.
- Wipe off excess paste immediately with a damp cloth or paper towel.
Be gentle when smoothing! Stretching the wallpaper too much can cause it to shrink slightly as it dries, leaving gaps between seams.
5. Trim Excess & Let It Dry

Once the wallpaper is in place, grab your utility knife and trim off any extra material at the top and bottom. It’s easiest to do this while the wallpaper is still damp.
Then, let everything dry completely before painting—this usually takes about 24 hours.
6. Paint The Beadboard Wallpaper

This is why I love this product so much! Now it’s time to paint the paintable beadboard wallpaper. This will set the wallpaper and make it hard to the touch.
Use high-quality paint for durability, especially if the wallpaper is in a high-traffic area.
One of the best things about beadboard wallpaper is that you can paint it to match your style.
- Choose the right paint – A satin or semi-gloss finish works great for that classic beadboard look because it makes it look like real wood.
- I found it easiest to use a roller for smooth coverage and a brush for the grooves.
- Apply 1-2 coats and let each layer dry completely before adding another.
A neutral paint color is always timeless, but don’t be afraid to go bold! A moody green or soft sage green can make beadboard wallpaper feel fresh and modern.
RELATED POST: The Best Dark Green Paint Colors
Our Paint Color:
If you are curious, we used the paint color Warm Putty by Valspar and it’s absolutely STUNNING! We have gotten so many questions about this color because it is the perfect warm neutral color that looks so good in every single lighting situation.


Wallpaper Maintenance & Final Thoughts
Once your wallpaper is installed and painted, it’s super easy to maintain. Just wipe it down with a damp cloth when needed.
If you ever notice a seam starting to lift, a little wallpaper adhesive will fix it in seconds.

My Thoughts After Having Paintable Beadboard Wallpaper In My House For Two Years
Paintable beadboard wallpaper is one of the most affordable and quick ways to add charm AND texture to your home. I was completely surprised at just how easy it was for one of our first DIY projects.
I would HIGHLY recommend it for someone who wants the look of a real beadboard without the hassle of cutting and nailing wood paneling in their home. If you are thinking about installing paintable beadboard wallpaper, I say, go for it—you won’t regret it!


Leave a Reply