The below post may contain affiliate links. This means we will receive a commission if you purchase through our link, with no extra cost to you. As an Amazon Associate we earn from qualifying purchases. Read our full disclaimer.

Getting designer-level curtains doesn’t mean you have to spend a fortune—or even know how to sew. This no-sew hemming method is PROOF that you can achieve high-end, custom-looking curtains every single time.
I’ve personally used this method on every single curtain in my home, and let me tell you—the results are stunning.
The secret? It all comes down to hanging them the right way and using this super simple, no-sew hemming hack. Once you know the steps, you’ll never look at store-bought curtains the same way again.
Here’s exactly how to do it:
Step 1: Hang Your Curtains Like a Designer


One of the biggest mistakes people make when hanging curtains is placing the rod too low and too close to the window frame—which makes your ceilings look shorter and your windows look smaller.
Here’s how to fix that instantly:
Mount your curtain rod 2-3 inches below the ceiling (or as high as possible). This creates the illusion of taller ceilings and we all want that!

Extend the curtain rod 6-12 inches on each side of your window(s), not including the finial. This makes the window feel larger and allows more natural light to filter in when the curtains are open.

Use wide curtain panels so they look full and luxurious instead of skimpy and flat.

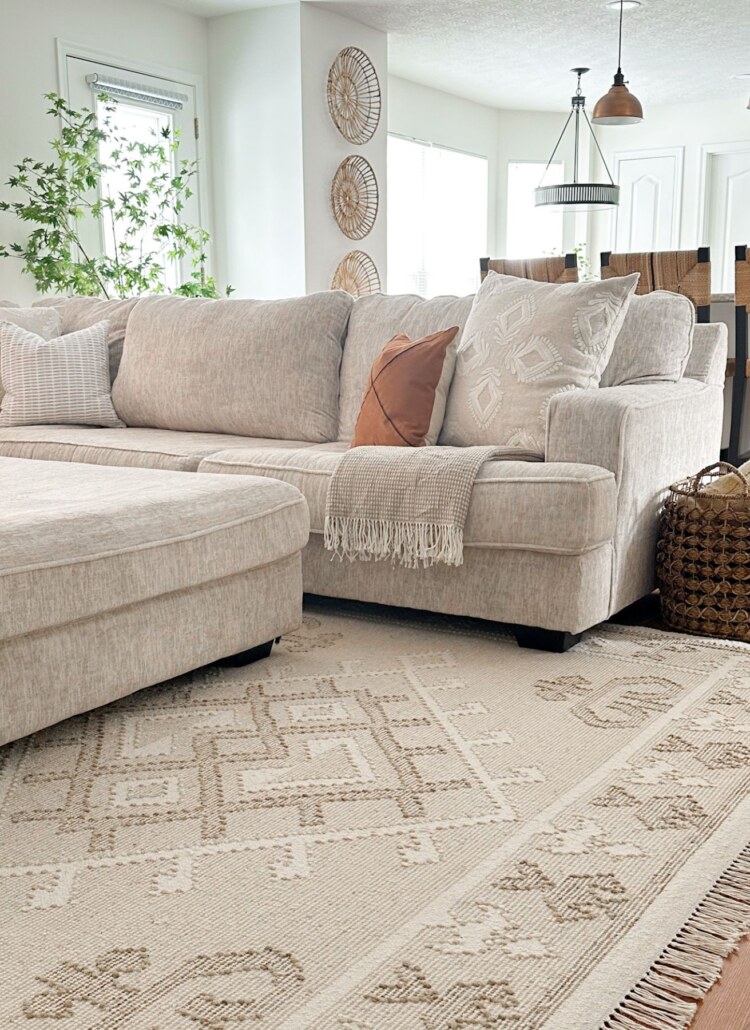
Curtains (similar) | Roman shades | Copper pillow (similar) | Neutral pillow | Couch | Faux tree
RELATED POST: How To Hang Curtains Like A Designer
Step 2: Choose the Right Curtain Length
Choosing the right curtain length is one of the most important steps in achieving that high-end, designer look. Curtains that are too short can feel awkward and out of place, while those that are too long can look messy and unfinished.
The sweet spot? Curtains that are “kissing the floor.” This is what gives them that custom, high-end, effortlessly beautiful look.
To get your curtains perfectly “kissing the floor,” make sure they’re long enough for your space. Here’s a quick guide:
- For 8ft ceilings: Go with 96-inch long curtains.
- For 9ft ceilings: 108-inch long curtains work best.
To achieve the ideal length, measure from the curtain rod to the floor and add an extra 2-3 inches for hemming.
Here’s a breakdown of curtain lengths:
✨ Floating (½ – 1 inch off the floor) – Great for high-traffic areas, but lacks that custom touch.
✨ Kissing the floor (just barely touching) – Also known as “grazing,” this is the most polished and high-end option.
✨ Breaking (1 inch onto the floor) – Works best on hardwood or tile in a formal setting.
✨ Puddling (extra fabric pooling on the floor) – Adds drama, but requires more maintenance (hello, dust!).
RELATED POST: Should Curtains Touch The Floor?
Step 3: The No-Sew Hemming Method (Using Stitch Witchery)
You can still get the perfectly hemmed curtains that you want without having to learn how to sew or use a sewing machine which is why I love this no-sew hemming method SO much!

You might wonder how that is possible. The answer? Stitch Witchery—a no-sew, heat-activated fabric bonding tape that bonds two layers of fabric together when activated by an iron.
It sounds complicated but, trust me, I have done this on every single curtain in my house and once you get the hang of it, it goes by fast!
What You’ll Need:
✔️ Curtains that are slightly too long
✔️ Stitch Witchery (or any fabric bonding tape)
✔️ Fabric marking tool (chalk or a fabric pencil)
✔️ Iron and ironing board
✔️ Scissors
✔️ Pins or fabric clips
✔️ Measuring tape
How To Hem Curtains With Stitch Witchery:
Step 1: Measure and Mark the Hem

- Hang your curtains to determine the perfect length. If possible, have someone help mark them while they’re hanging.
- Use a fabric pencil or chalk to mark where you want the hem to be.
- Measure and fold the fabric up to the marked hemline, making sure it’s even across the entire curtain.
- Use pins or clips to hold the fold in place temporarily.


Step 4: Insert the Stitch Witchery


- Place the bottom of your curtains on your ironing board. I like to place my ironing board right next to my windows/curtains to avoid having to take my curtains down and lay them on a flat surface.
- Open your folded hem and place the Stitch Witchery inside the fold, running it along the entire length of the hem. Make sure the fusible tape is completely tucked within the fold so it doesn’t peek out.
Step 5: Press with an Iron

- Set your iron to the correct heat setting for your fabric (medium-high for cotton/linen, low for delicate fabrics).
- Press the iron down firmly on one section for 10–15 seconds (don’t slide the iron—just press and lift).
- Continue this process, moving section by section, slightly overlapping as you go.
Step 6: Let the Hem Cool
Curtains | Curtain rod | Chair | Rug | Pillow | Faux tree
- Allow the fabric to cool completely before handling it—this helps the bond set properly.
- Double-check the hem to make sure it’s fully fused. If any spots aren’t secured, add additional hemming tape or reapply the iron.
And that’s it! You now have perfectly hemmed curtains that look custom-made—without ever touching a sewing machine. 🙌
Why This No-Sew Hemming Method Works (And Why It’s Worth It)
This method is perfect for someone who does NOT know how to sew and doesn’t want to spend extra money on custom-tailored curtains.
It’s a quick solution that will last just as long as the traditional sewing machine hemming method. AND it will look just as good!
It’s an easy DIY hack that allows you to hem your curtains fast, easily, and on your own!
As I mentioned before, I have used this method so many times before and I couldn’t recommend it more. It has held up for years and looks incredible!
Don’t Miss Out on More Easy Curtain Hacks!
Now that you know how to get designer-level curtains every single time, take it a step further with these must-read curtain tips:
- How To Hang Curtains Like a Designer – The exact tricks designers use to make curtains look flawless.
- How to Make Curtains Look Expensive (Ultimate IKEA Curtain Hack) – A budget-friendly trick that instantly elevates your curtains.
- Should Curtains Touch the Floor? – The Most Popular Answer! – A deep dive into the best curtain lengths for every space.
These tips will completely transform the way you style curtains in your home!


Leave a Reply