The below post may contain affiliate links. This means we will receive a commission if you purchase through our link, with no extra cost to you. As an Amazon Associate we earn from qualifying purchases. Read our full disclaimer.
Tile backsplash is an absolutely beautiful upgrade to your home. In kitchens, it can dramatically improve the look and feel. In dining rooms, tile backsplash can make a statement. Not only is it for looks, but it also helps protect your walls from any kitchen chaos that may occur.
At this point, you may be wondering if installing backsplash is doable on your own. Well, good news – out of all of the DIY projects you could take on, tiling backsplash is a lot more doable than you would think. And even more good news, you can save hundreds, if not thousands, of dollars by doing it yourself.
I have now installed backsplash in my kitchen and dining room on my own, and if I can do it, you 100% can too! 😊 I’ve learned a lot along the way, and that’s why in this post I’ll be covering exactly how to install tile backsplash.
Consider this your “tiling backsplash for beginners” complete guide! Before we get started, let’s go over some good-to-knows, wish-I-knews, and tips for upgrading your space with backsplash.
If you want to skip to the how-to, click here.
What is the most popular backsplash for a kitchen?
The most popular types of backsplash are glass, ceramic, porcelain, and marble. If you go to Home Depot, Lowe’s, Floor & Decor, or The Tile Shop, these are the types of materials you’ll most likely see for backsplash.
Each type of tile has its advantages and disadvantages – and disadvantages are mainly just price differences.
Price aside, it’s really going to come down to personal preference for the look you want. I wouldn’t worry as much about the type of material as I would about getting something that makes you happy (and of course that looks amazing)!

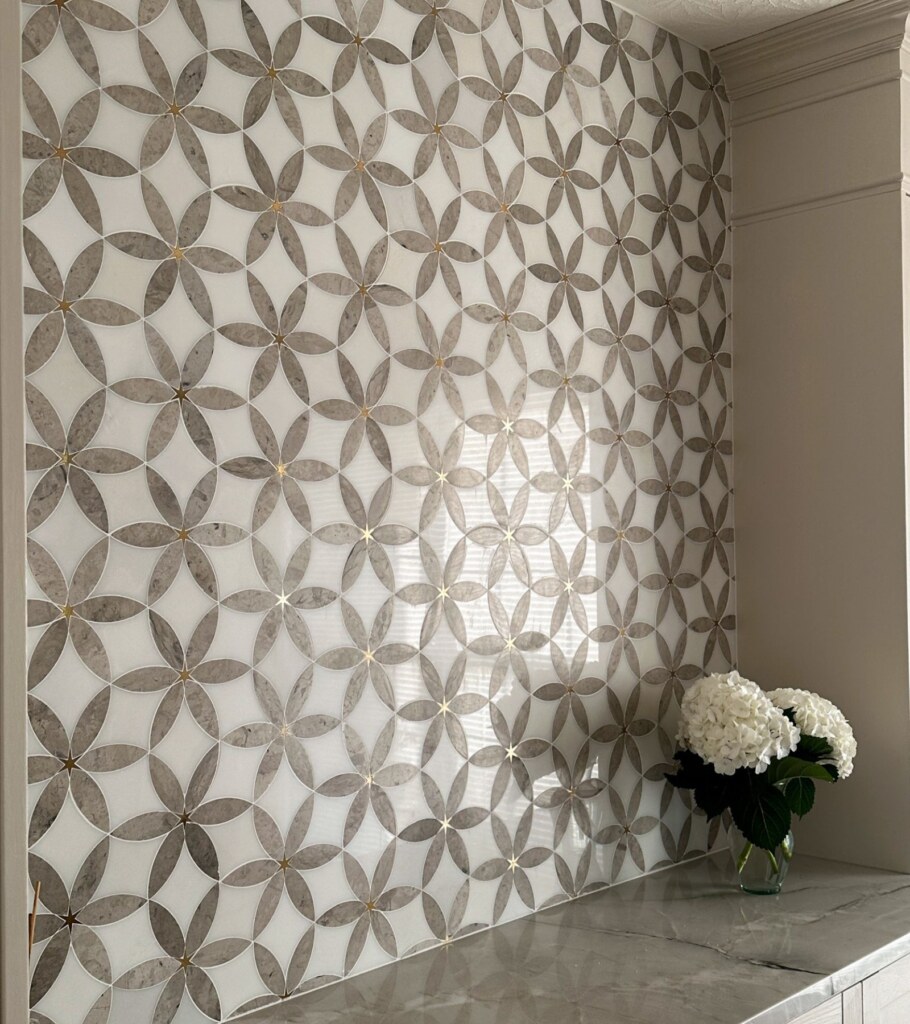
There are some types of porous backsplashes, like marble, that require an extra step. Why? Because they’re absorbent, which means without properly sealing after installation, they can stain if you don’t wipe up splashes or spills immediately.
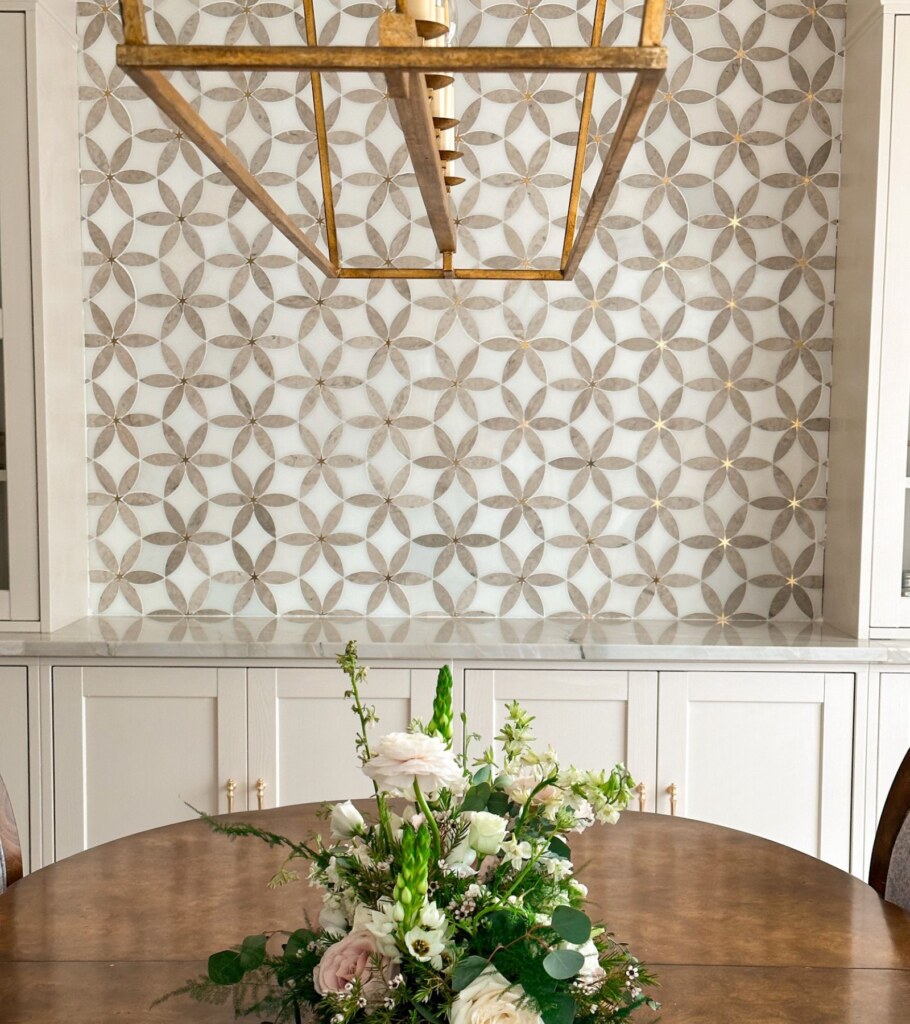
Don’t let this deter you from marble or other porous stones, because IMO, these stones have some of the most impactful backsplash patterns that tile has to offer.
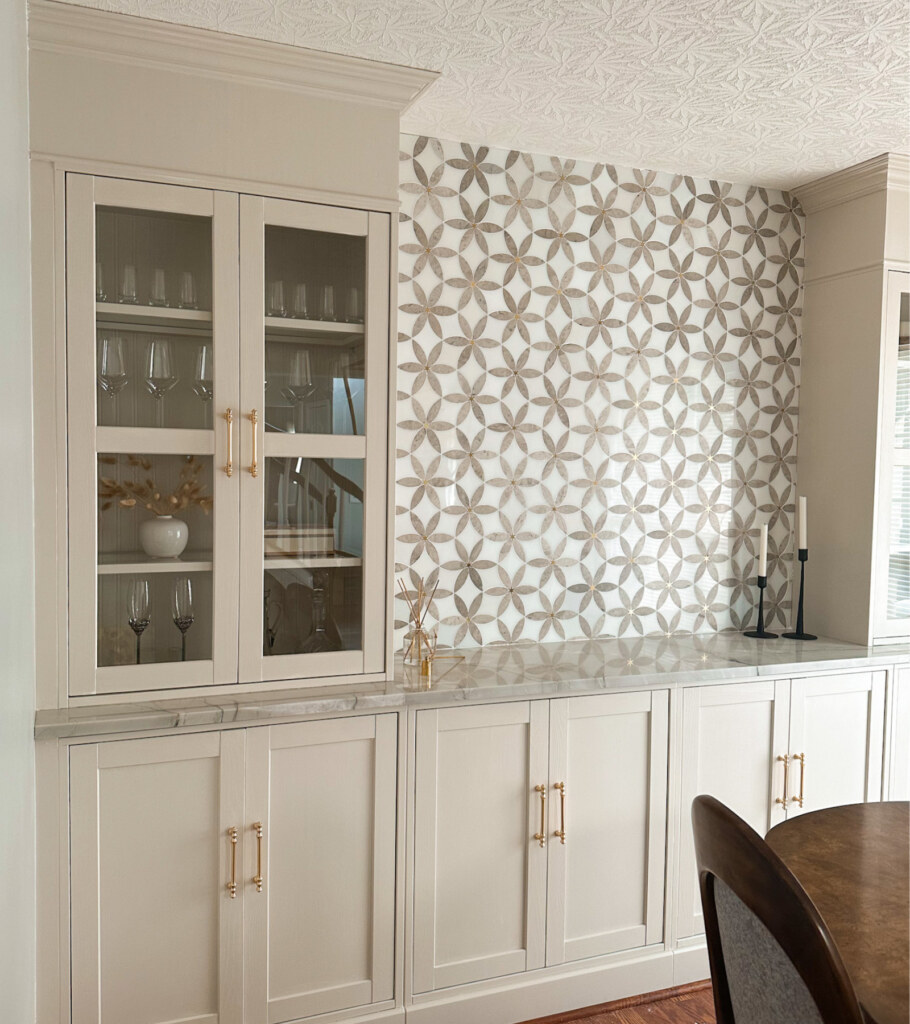
Plus, sealing is extremely easy – you just wipe the sealant over the backsplash. And if it makes you feel any better, both my kitchen backsplash and my dining room backsplash are marble mosaics! I’ve never had an issue with either of them.
For good measure, I recommend sealing most types of backsplash, but we’ll get into that later.
Should backsplash be the same color as the countertops/cabinets?
Simple answer: no, it doesn’t have to!
Backsplash is your time to shine. There are no rules around your backsplash matching your countertops or cabinets. With that being said, there are some things to think about when choosing the color and pattern of your backsplash.
Countertop Patterns
If your countertop is filled with beautiful patterns, I would recommend keeping your backsplash a little more simple and neutral.
A countertop with a lot of pattern already has the spotlight. Choosing a bold backsplash, in this case, will have your backsplash and countertop competing for that spotlight.
Now if your countertop is a little more on the simple side, I say go for that bold backsplash. But you don’t have to – even if you have a simple countertop, you can go for a simple backsplash to create a nice clean, and crisp look.
Colors
When thinking about how to install tile backsplash, take a step back and look at the color of your cabinets and countertops to decide the look you want to go for.
If you want a dark, moodier kitchen, a dark backsplash might be your best option!
If you want to make your kitchen feel bigger and brighter, going for a lighter backsplash is your best option. This is most often what I see people wanting for their kitchen goals.
One of the best things about backsplash? It’s an opportunity for you to add an accent to your space.
Remember, this is all just generally speaking – every kitchen has its own unique vibe which calls for its own unique backsplash. If you love it, then go for it!
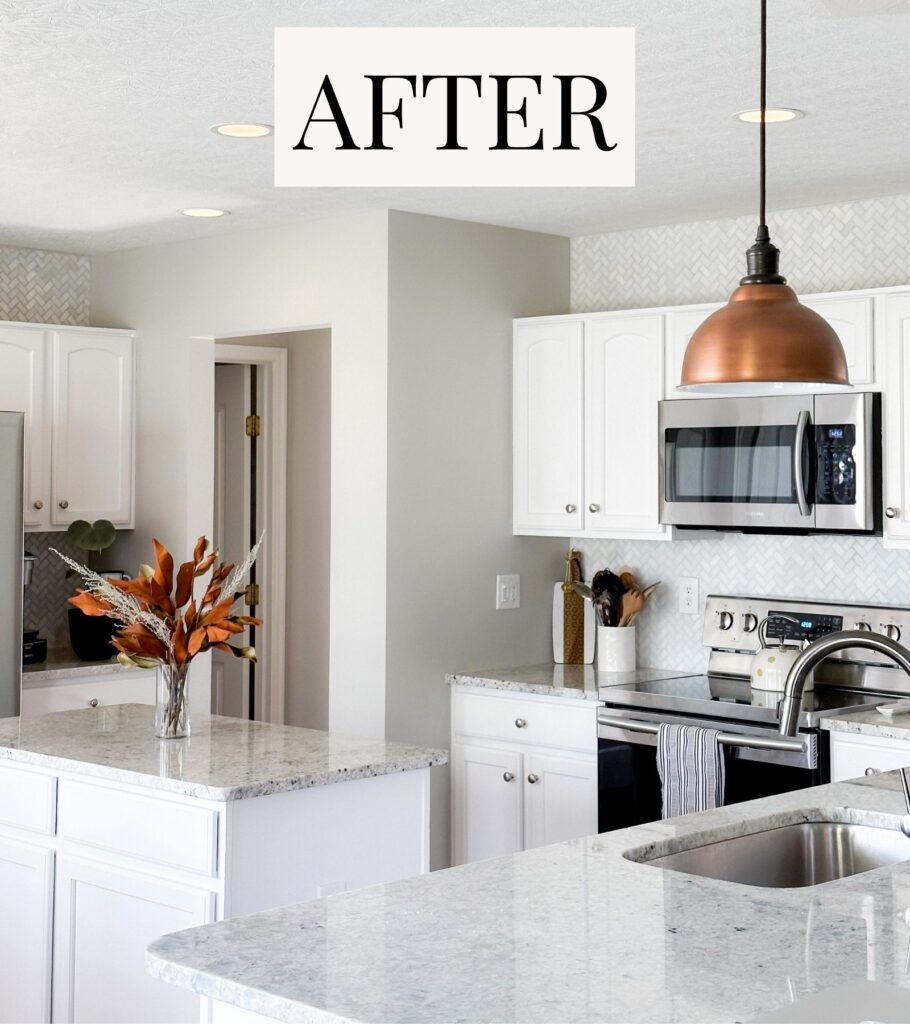
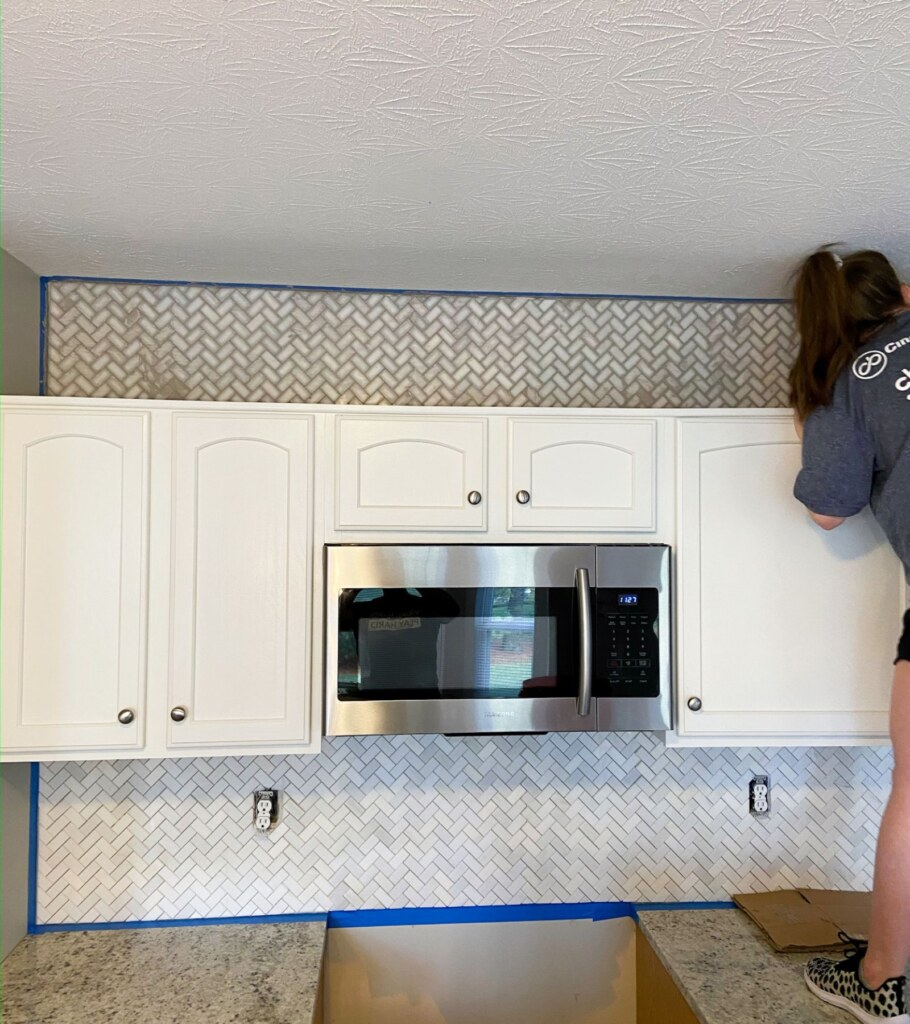
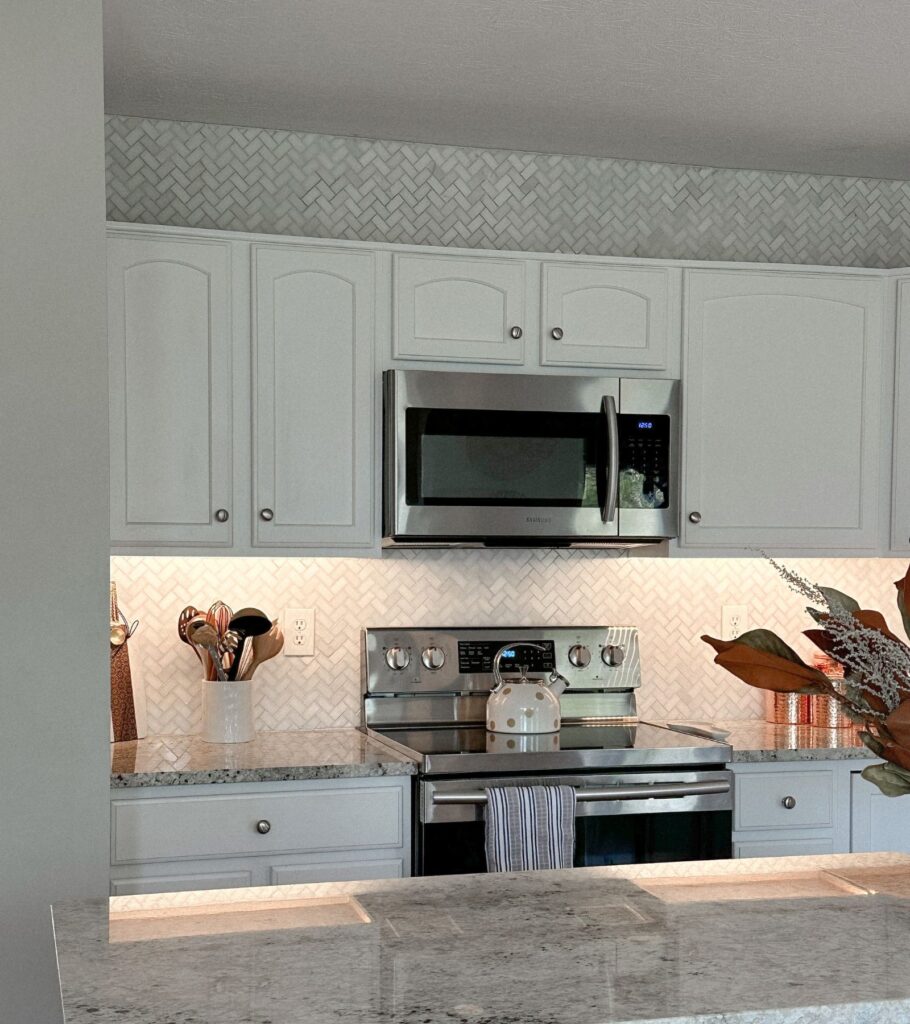
When we first moved into our home, I painted the cabinets white, replaced the countertops with light grey granite, and installed our white herringbone backsplash. My goal was to make the kitchen feel big with the light colors while accenting it with darker ones – such as my copper pendant lights, dark walnut butcher block table and chairs, etc.
RELATED POST: The CUTEST Ways to Style a Kitchen with Copper Accents

Premixed Tile Adhesive vs. Mix-It-Yourself Thinset: Which is Better?
Let’s talk about how you will adhere your backsplash to the wall. When you go shopping for your materials, you will see two kinds of adhesion – premixed tile adhesive and mix-it-yourself thinset.
Premixed adhesive will come in different-sized tubs, while mix-it-yourself thinset will come as a powder in bags that will need to be mixed with a polymer additive.
Since this is a post on tiling backsplash for beginners, I’m going to recommend the premixed wall adhesive.
There’s a big debate in the backsplash world on whether premixed wall adhesive vs. mix-it-yourself thinset is the way to go. While there are pros and cons for both, to simplify the process on your end, I think premixed is going to do exactly what you need it to do (stick it to the wall). 😉
In fact, I’ve used both the premixed adhesive (for my kitchen backsplash) and the thinset (for my dining room accent wall), and the tiles are still up there on both lol.
The mix-it-yourself thinset takes a little more effort (and a couple more materials) to make it and keep your application consistent throughout the entire process.

If this is truly your first time installing tile backsplash, then premixed should be your choice of adhesion.
If you’ve installed tile backsplash previously, even if you used premixed the last time, I would up your game to the thinset. At this point, you’re probably a little more acclimated to the process than when you were first learning how to install tile backsplash.
Premixed wall adhesive is perfect for beginners and will get you used to the process of installing backsplash. That way when you go for round two in the future, you’ll be ready to upgrade to the mix-it-yourself thinset!
Oh btw, did I mention that these wall adhesives are strong? If you’re worried about your tiles falling off the wall, let me ease your mind by saying your tiles aren’t going anywhere once the adhesive or thinset dries!
If you’re using larger tiles that are bigger than 15”x15”, I would recommend that everyone, new or experienced, use thinset – the mixture will be better for those larger, heavier tiles!
Recommended Products
For premixed tile adhesive, my only experience has been with the OmniGrip product from Home Depot. This is what I used for my entire kitchen backsplash and it was very easy to use!

For my latest project, I used the MAPEI brand you can find at Lowe’s for both mix-it-yourself thinset and grout, and definitely recommend it.
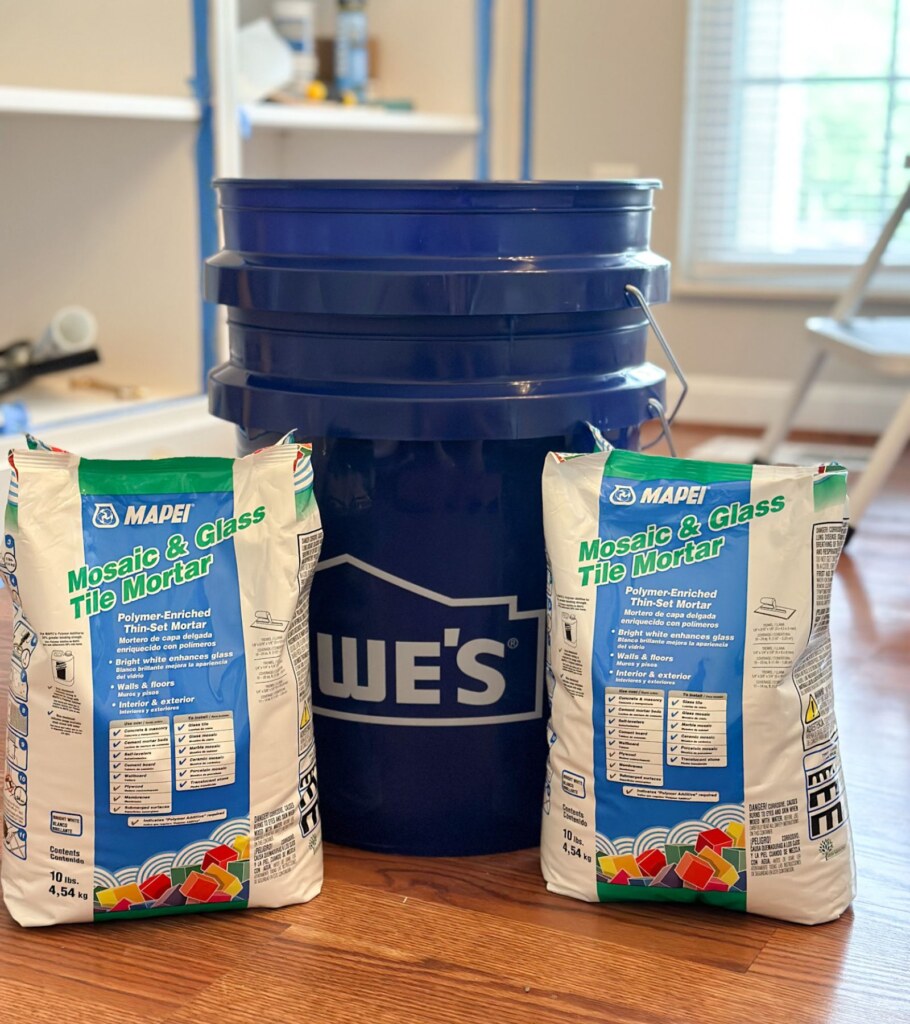
No need to go crazy with specialized brands for thinset and grout from specific tile stores. They can sometimes be a lot more expensive than stores like Home Depot and Lowe’s. In the end, they do the same thing!
For beginners tiling backsplash, keep it simple. I’ve used both expensive and standard brands alike, and there’s not a real advantage to either.
Sanded vs. Unsanded Grout: Which Should I Buy?
If you take anything from this post on how to install tile backsplash, at least take this section. I cannot stress this difference enough – because I made a HUGE mistake my first time installing backsplash in my kitchen lol. More on that in a minute.
What is grout? Grout is what I like to call the “filling” between your tiles, locking them together for a seamless look that offers protection to your tiles and walls.
Let’s dive a little deeper into sanded vs. unsanded grout for backsplash.
Unsanded Grout
For backsplash, you will almost exclusively use unsanded grout. And if you’re using glass, marble, metal, porcelain, or any other tile that has a glossy, polished finish, you NEED to use unsanded grout.
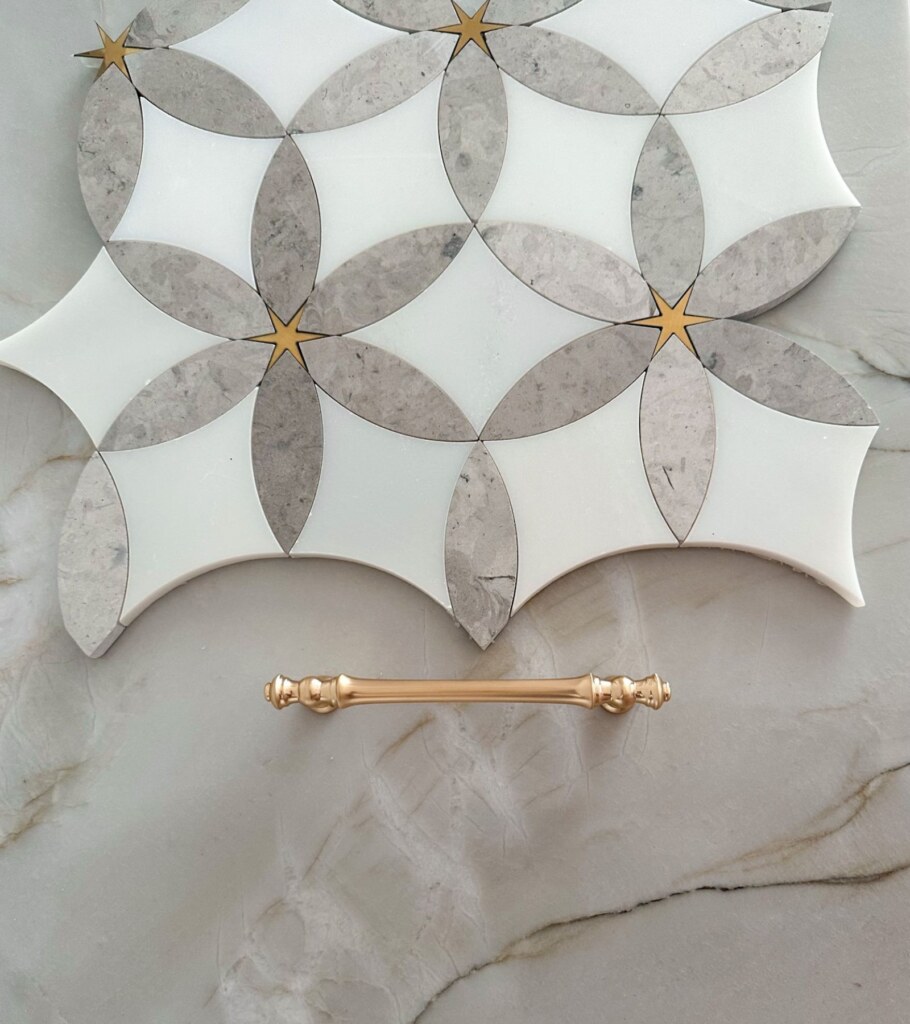
Are you installing a mosaic backsplash? Use unsanded grout! A mosaic backsplash is when you have small tile pieces held together by a netted backing.
Now that we have that out of the way, here are some unsanded grout facts to help you understand a little more!
- Use when the spacing between tiles is 1/8 inch or smaller.
- As the name implies, no sand particles are mixed into the grout.
- Sand free = stickier grout = better for vertical applications such as backsplash.
- Unsanded grout will not scratch polished, sensitive tile.
Sanded Grout
Now that we know the key facts about unsanded grout, here are a few about sanded grout to help you understand the difference (and why you most likely won’t be using this for backsplash).
- Use when the spacing between tiles is greater than 1/8 inch.
- As the name implies, sand particles are mixed into the grout.
- Sand = more durable, gritty grout = better for high-traffic applications like floors.
- Sanded grout will scratch polished, sensitive tile.
My Huge Mistake
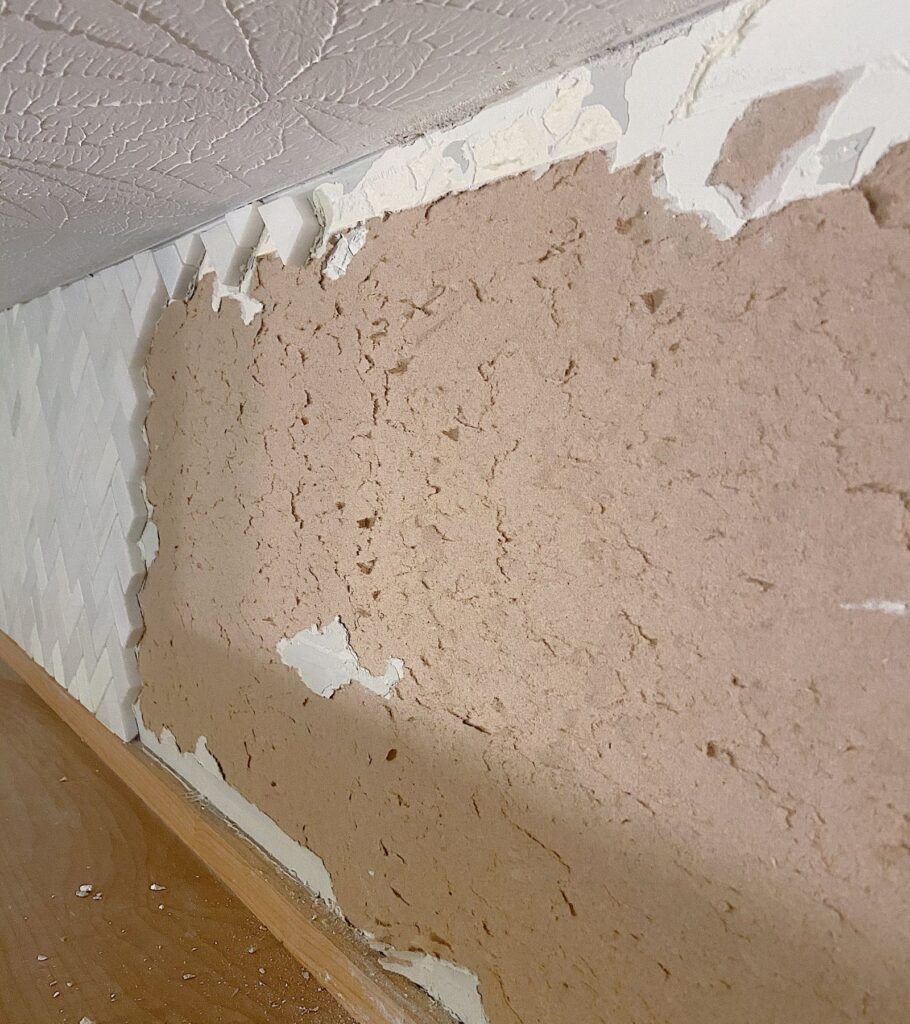
Quick story time – during my first backsplash tiling experience, I was heavily influenced by an uninformed hardware store associate on what to buy for my project.
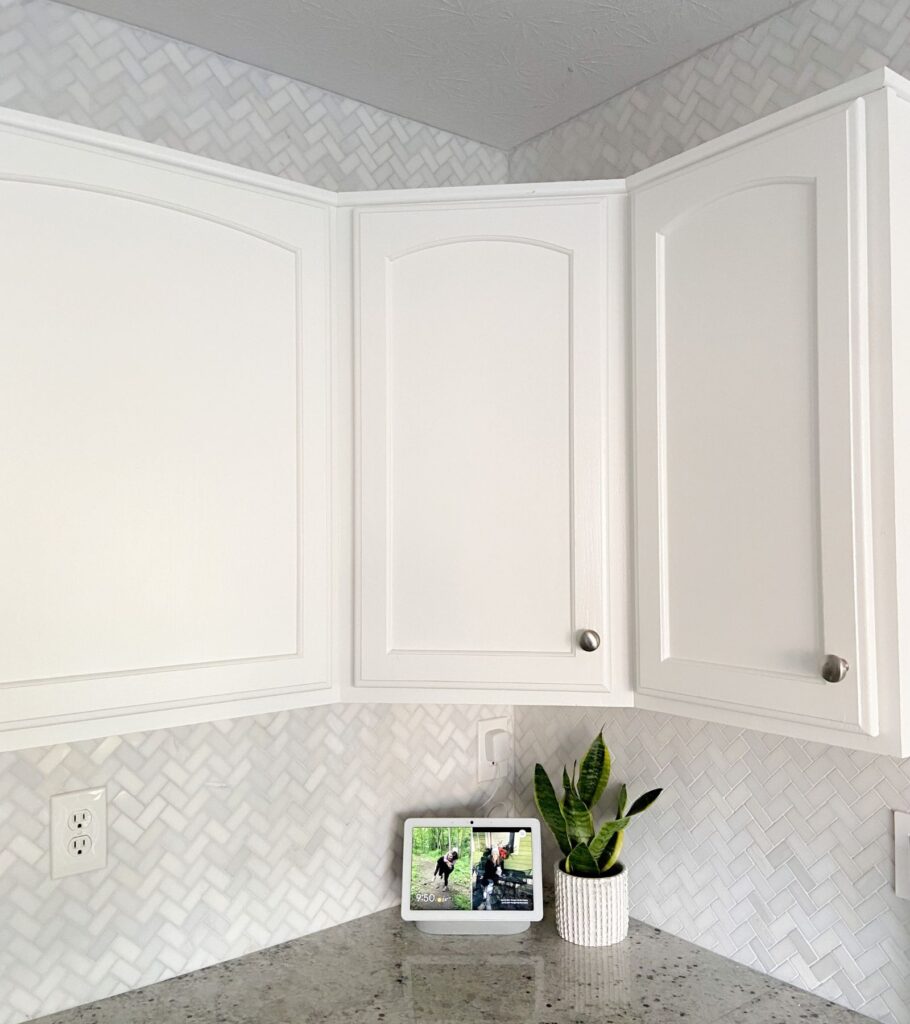
The white herringbone backsplash in my kitchen is a polished marble mosaic. Well, years ago I didn’t know the difference between sanded and unsanded grout – you already know where this is going…
I had the tile in my hand and the associate recommended a big bag of, yes you guessed it, sanded grout.
So there I am, a first-time grouter, grouting this inconspicuous area of backsplash above my refrigerator just in case anything goes wrong. And oh did it go wrong. 😂 But again, that’s why with anything I say try it on the most unnoticeable spot you have!
The sanded grout scratched the life out of three tiles. My husband and I noticed the dramatic change in shine quickly enough to stop before any more tiles were ruined.
Note that the tile adhesive was completely dry at this point, so we had to literally rip the backsplash off the wall.
The only positive about this experience was that I learned how to repair ripped drywall that looks like cardboard, which I included in this post here! Ooo seeing the pictures of the damage makes me cringe.
The moral of the story, it’s extremely important that you know the difference between sanded and unsanded grout, and when to use each. When considering how to install tile backsplash, please do not make the same mistake I made!
RELATED POST: How to Fix a Dent in a Wall (Or Hole) – 3 Insanely Easy Steps!
Can You Install Tile Backsplash Over Painted Drywall?
Absolutely! And that’s exactly what I’ve done for both of my own backsplash projects.
As long as your drywall is clean and damage-free, you’re in the clear to install backsplash right over painted drywall.
When you deal with a “wet area” such as showers, that’s where you need to install backer board for moisture protection – and I recommend doing research on that process. In the kitchen, you don’t need any type of backer board.
Installing backsplash on top of drywall is super easy! That’s exactly what I’ll be covering at the end of this post.
If you have any small holes that you need to fill prior to installation, I’m going to recommend my post on how to patch a hole or dent in a wall.
Backsplash Installation Cost
The cost of your backsplash project will mainly be dependent on two things: the tile you choose and how much space you have to cover.
A lot of backsplash tiles are sold by square foot, or close to it. You can get a rough estimate of the cost by simply measuring where you’re installing backsplash, and figuring out how many tiles you’ll need.
Depending on the price of your backsplash tiles, you could potentially get away with only spending a couple hundred dollars on all of your tile! Compared to having it professionally installed, it’s a steal to DIY your own backsplash.
RELATED POST: 9 Simple Small Kitchen Remodel Ideas on a Budget
How to Install Tile Backsplash
List of Materials and Tools
- Backsplash Tiles of Choice
- Tape Measure
- Trowel (3/16” V Notch Trowel For Most Backsplashes)
- Premixed Tile Adhesive or Mix-It-Yourself Thinset
- Grout Float
- Grout
- Sponges
- Bucket
- Mixing Tool Drill Attachment and Drill
- Caulk and Caulk Gun
- Wet Saw (Rentable)
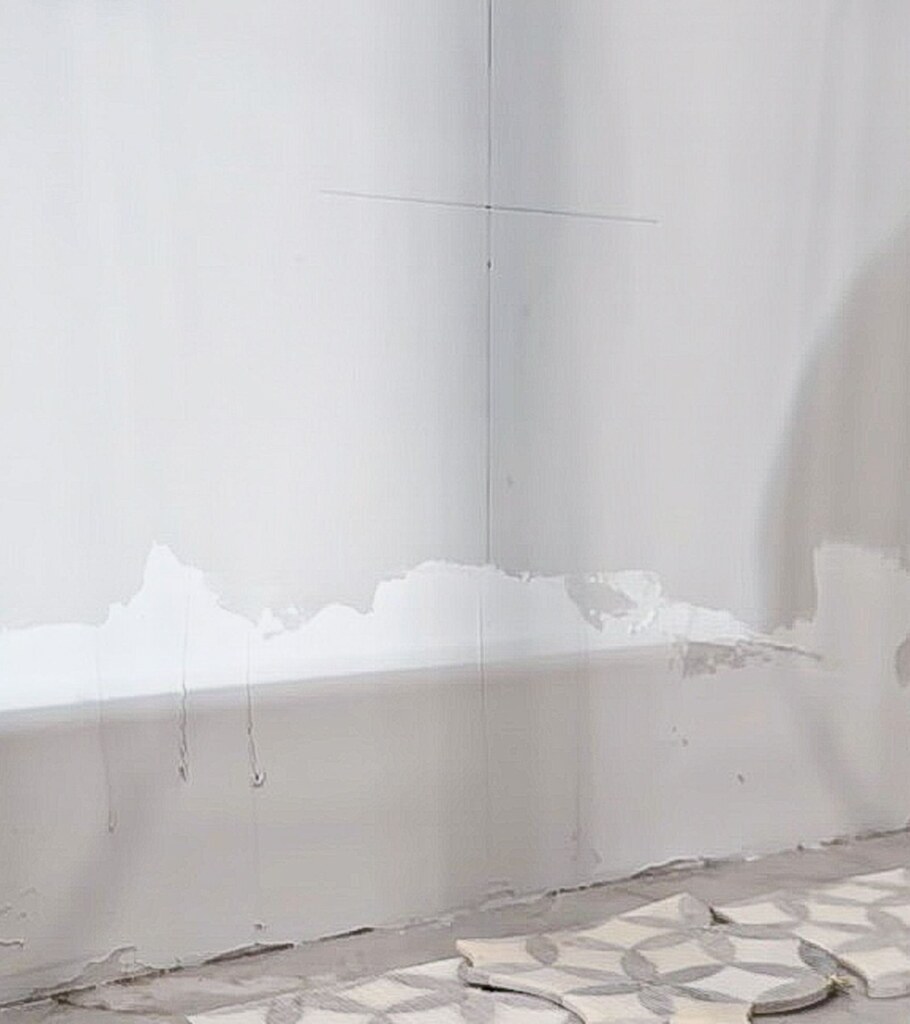
1. Prepare Your Wall and Space
Ensure that the surface you will be installing your backsplash on is damage-free, debris-free, etc.
Remove any outlet and switch covers so that later on you can tile as close to the cutout as possible. Important: Do NOT tile over the metal ends of your outlets or switches (the top and bottom that you screw into).
Turn off the power to all outlets and switches you’re working around. Then unscrew the outlets/switches and pull them out just slightly. That way you won’t accidentally tile over them, making them impossible to remove.
To protect your countertops, you can use drop cloths, tarps, or blue tape while you install your backsplash.
2. Measure Your Wall
Before purchasing all of your tiles, you need to measure your space.
Measure the distance between your cabinets and countertops, and the width of each wall where backsplash will be installed.
Multiply the total width of your walls (in feet) with the total height of your backsplash area (in feet) to get the square footage.
This will give you a rough idea of how many tiles you may need to buy.
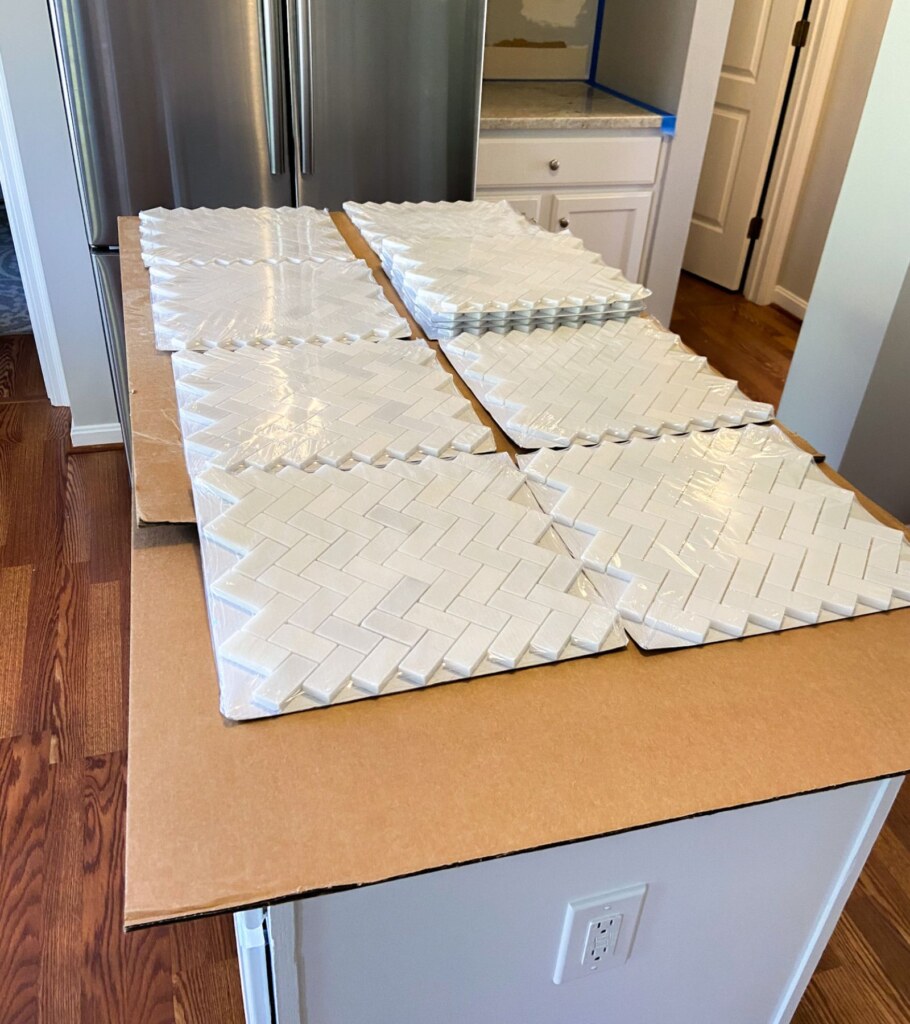
Buy a few more tiles than you think you need. Trust me, you will always need another half piece here and there and it’s better to have those extras sitting around than running back to the store. You can return any that you didn’t use later.
For a large project like a kitchen, I recommend having anywhere from 7-10 extra tiles.
While this may seem like overkill, after you have to cut full tile pieces just for a small part of it, you’ll find that you can go through pieces quite quickly. You also need some room for error! It happens to the best of us. 😊
3. Cut Your Backsplash Tiles
When it comes to cutting tiles, rent a wet saw from Home Depot. It is very cheap – a lot cheaper than you’d think. They’ll give you the rundown on how to use it, plus you can watch YouTube tutorials. Most tiles are going to require a wet saw for a clean-cut.
Just be careful, wear goggles, a mask, and ear protection.
If you have simple ceramic or porcelain tiles, you can give the tile cutter a try. I don’t personally have experience with the ceramic tile cutter, so again, YouTube is your best friend!
Before you cut your tiles, make sure that you are 100% confident in your measurements for each tile.
Measure, measure, measure!
Precise measurement at this step is critical to getting a beautifully fitted backsplash in your space.
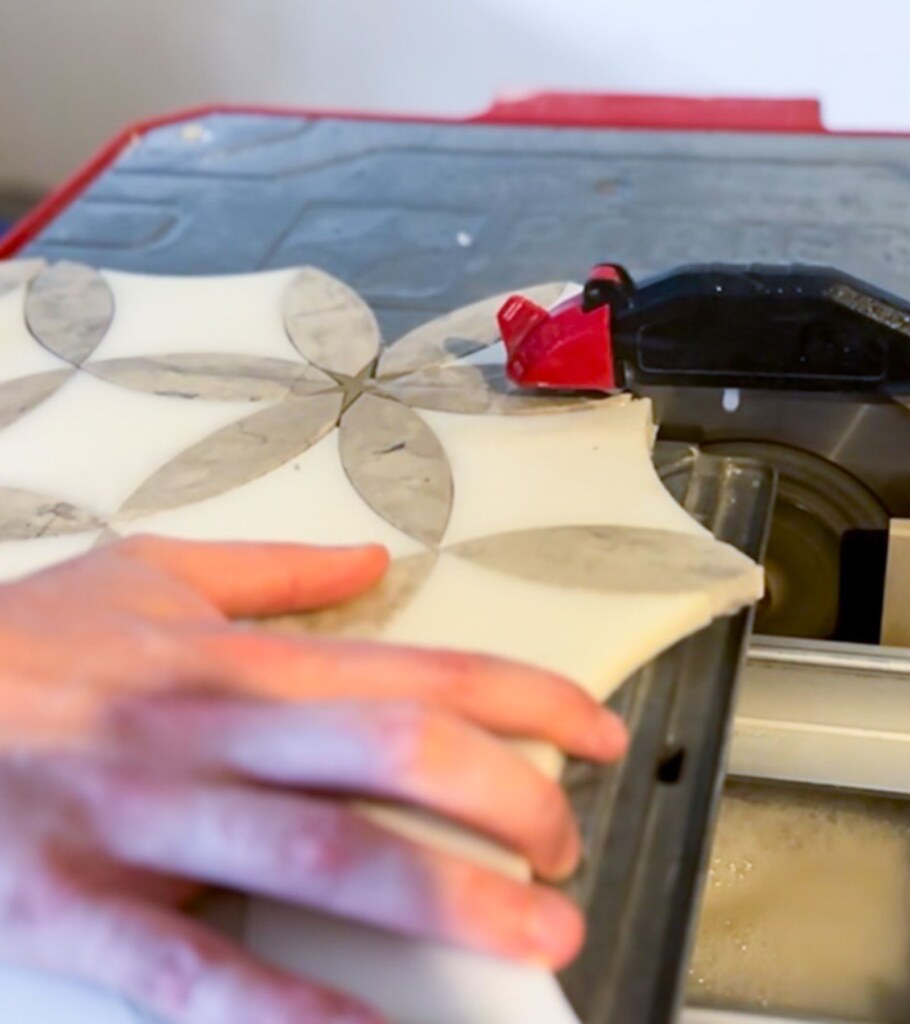
I like to use a pencil to draw a line on my tiles for where I need to make my cuts.
One of the most important aspects of how to install tile backsplash is ensuring that you cut and install that first piece correctly!
The first piece will be the foundation for your backsplash. You will start building out the backsplash from there. After the first piece, it will almost become a game of piecing the puzzle together.
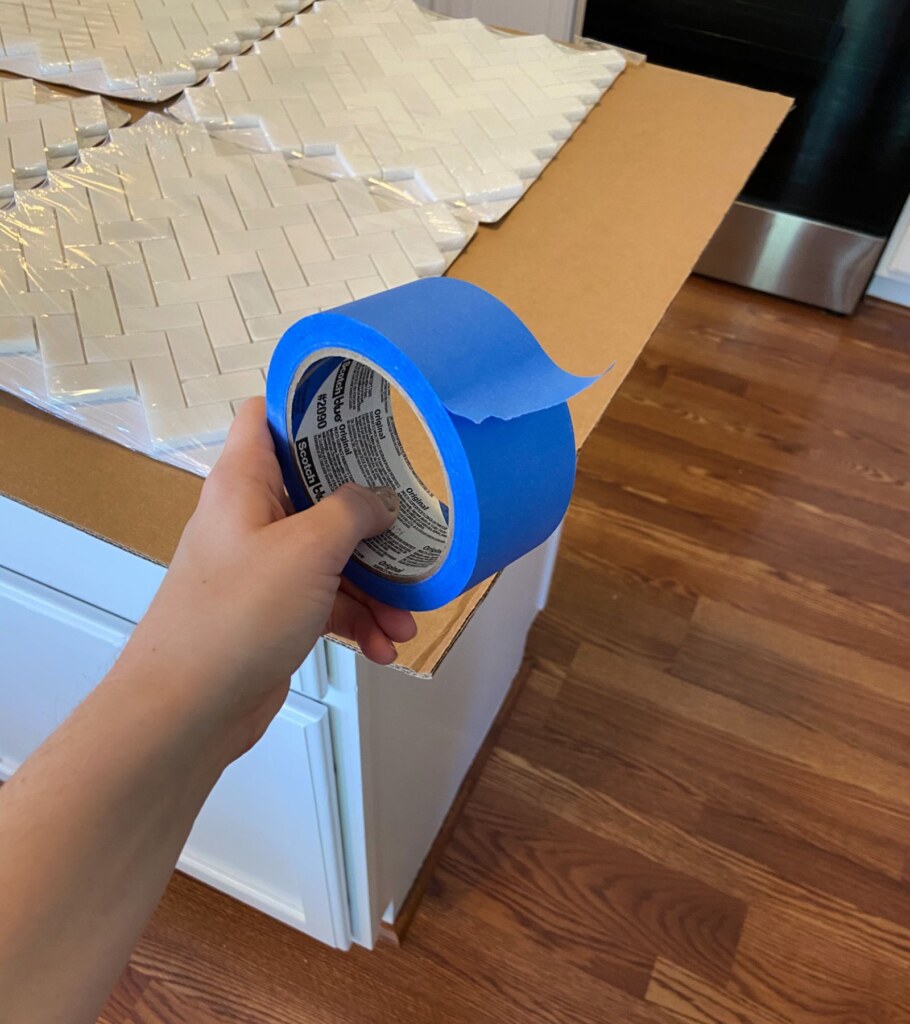
I like to dry-fit the first couple of pieces (hence the blue tape below). This gives me a good idea if my first pieces are going to fit nicely and are cut correctly.
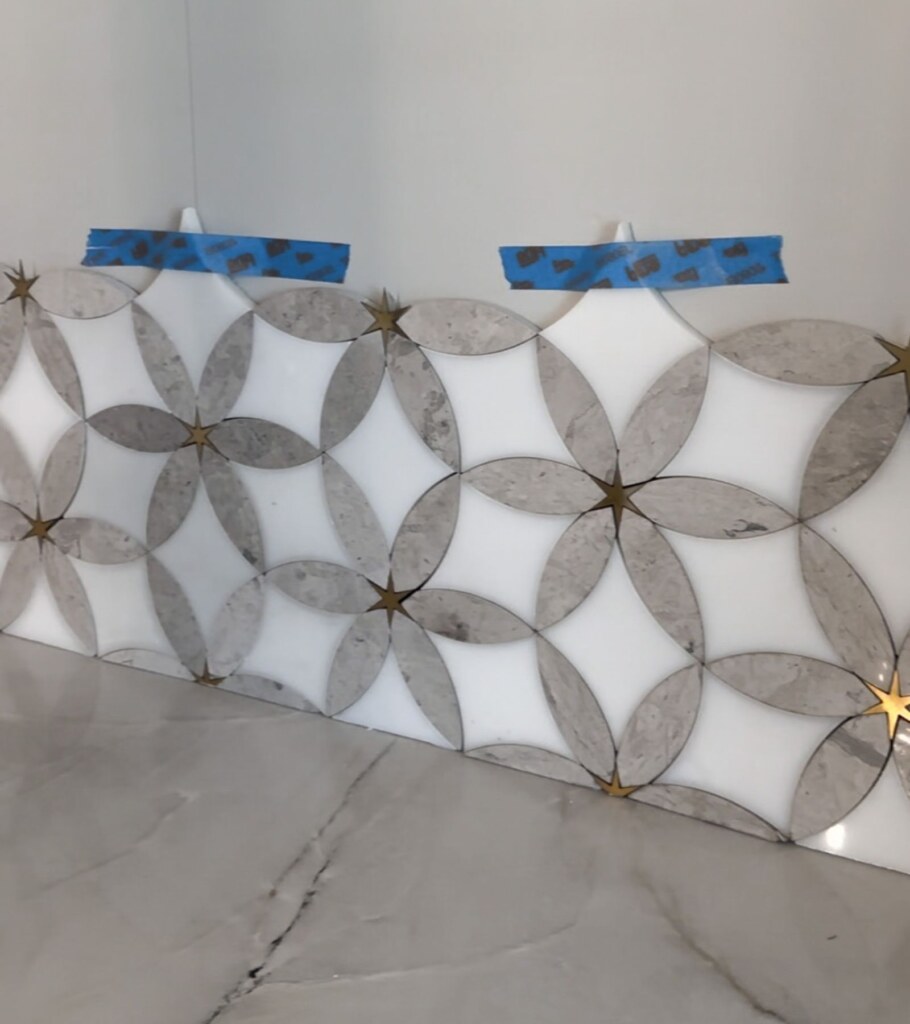
Little tip: You don’t need to have ALL of your backsplash tiles cut before you start the next couple of steps. This is good to know when first learning how to install tile backsplash.
My husband and I have taken the approach of cutting a few tiles at a time, applying thinset in small sections, and then installing the tiles over that small area.
Then repeat!
Countertops, cabinets, and walls are NOT level all the way across.
Don’t assume that the size of your first tile will be the same for all other tiles – because it won’t unfortunately. Even if it’s off by 1/8 of an inch, that difference matters and each tile needs to be cut accordingly.
Cutting and installing a couple of tiles at a time will help you measure along the way!
4. Apply Wall Adhesive/Thinset As You Go
Once you have your first couple of tiles measured and cut, it’s time to apply your wall adhesive!
While this seems like a difficult step, it’s really not! It’s basically just like adult glue lol.
Using the 3/16” V notch trowel, scoop out some wall adhesive (or your thinset) onto the wall. Begin to smooth it with the straight edge of the trowel. Again, you can work in small sections!
Once the wall adhesive is smoothed out in your first section, start to create your combed lines. With the notched side of your trowel, draw even comb lines across the section you’re working in.
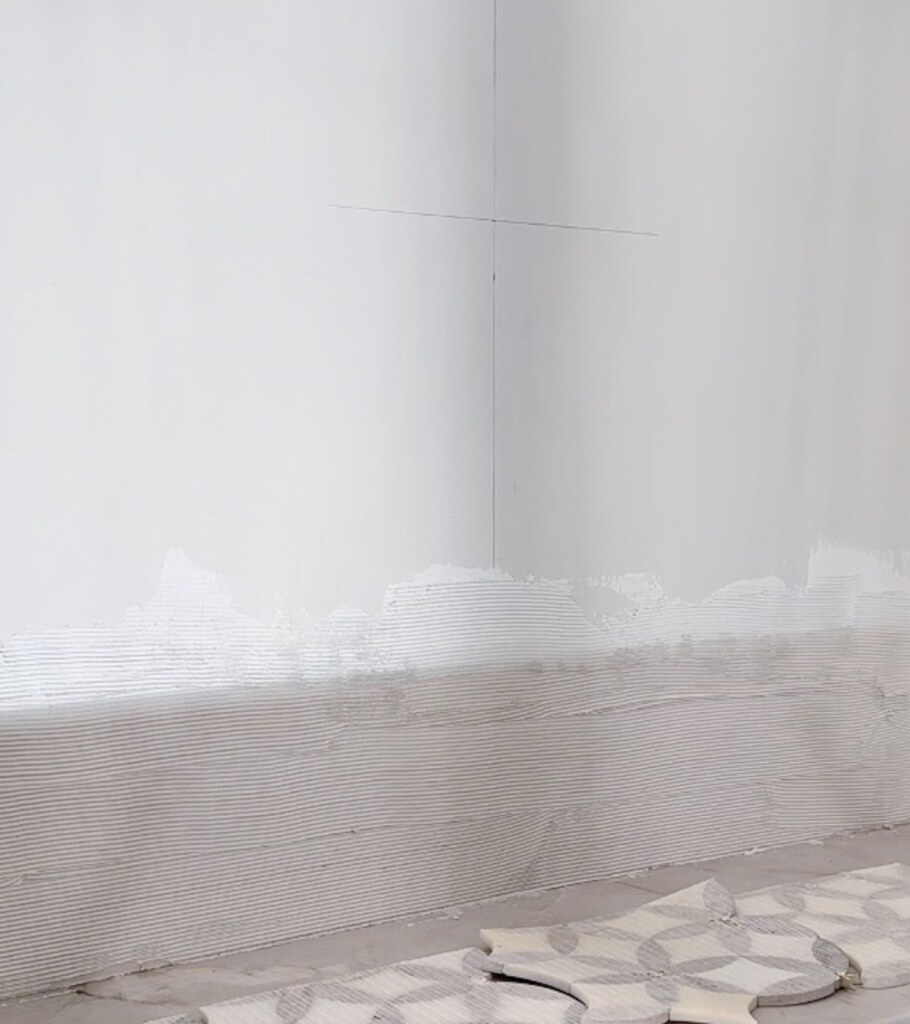
Ensure that the whole section has even comb lines before installing the tile.
It’s best to only apply a couple of feet at a time so that the adhesive doesn’t dry. It will start to dry pretty quickly.
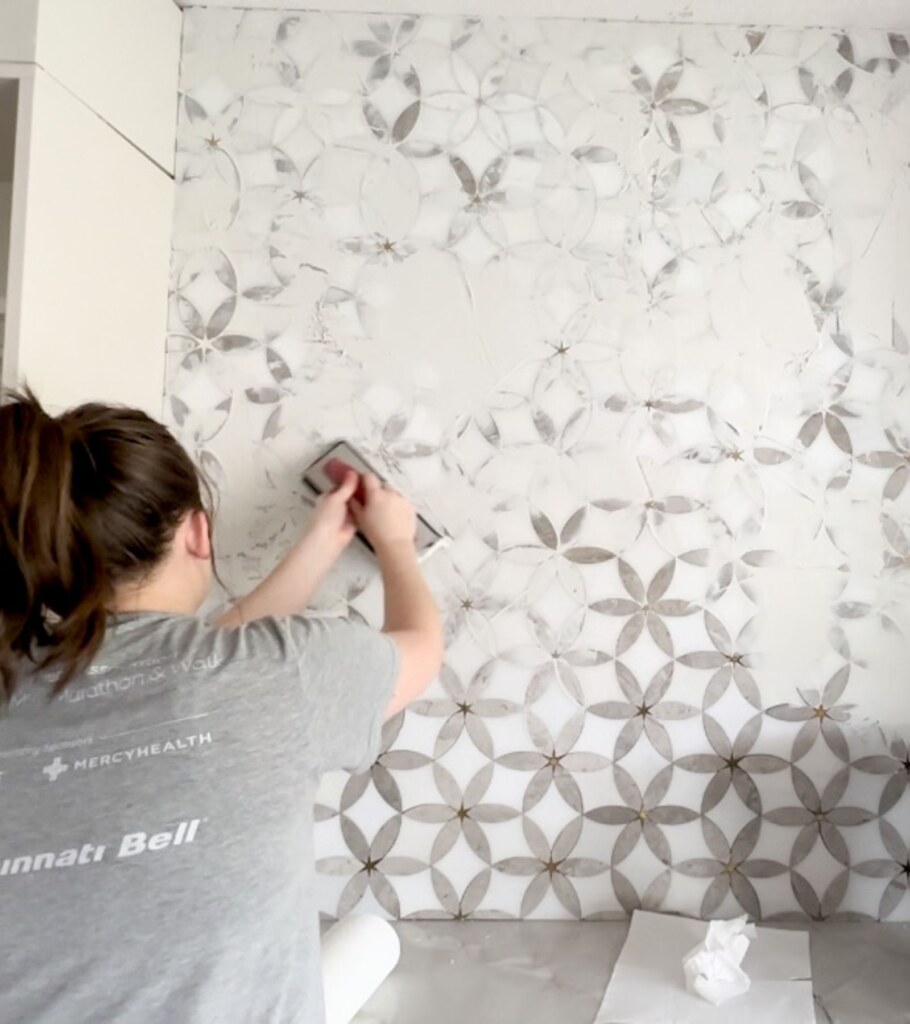
5. Install Your Backsplash Tiles
Install your first several tiles where you’ve applied the wall adhesive.
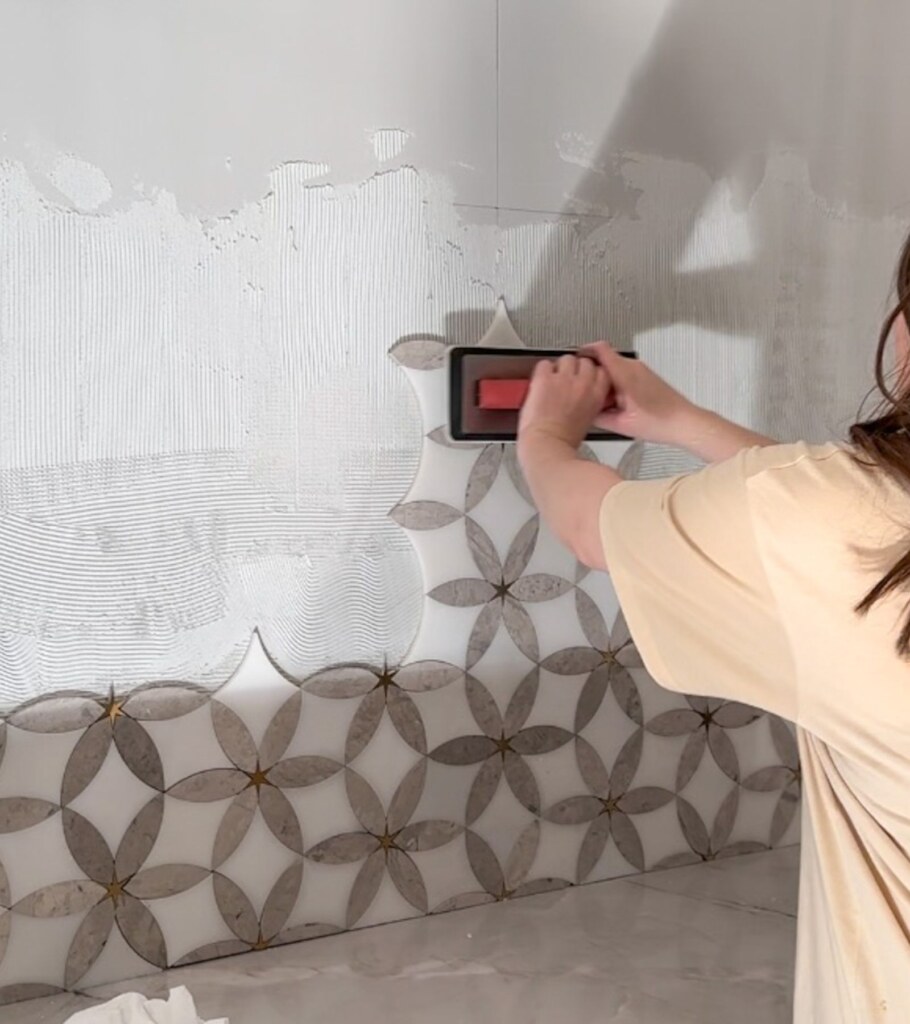
Using a grout float, firmly press your tiles into the wall, securing them into the wall adhesive.
Make sure that when you press your tile into the adhesive, it isn’t seeping back up through the cracks. If it seeps a little, that’s fine. There just needs to be enough room in the cracks for grout (more on grout next).
If you’re using individual tiles, like subway tiles, you’re going to benefit from tile spacers so that your tiles stay evenly spaced while drying.
For mosaic tiles, you shouldn’t really have an issue with sliding. I didn’t use tile spacers on either of my mosaic backsplashes and didn’t have any problems with sliding.
Repeat steps 3-5 until you have tiled your entire backsplash!
Once all backsplash has been installed, allow the adhesive or thinset to dry based on the product’s instructions prior to moving on to the next step.
Now would be a good time to clean off your tiles with a damp cloth if you accidentally got any adhesive on them during this process.
6. Mix the Grout
When thinking about how to install tile backsplash, grouting is the step that pulls it all together!
If your hands weren’t already dirty, this step will fix that lol!
Get a large bucket from your hardware store – you can find them on the ends of the aisles all stacked up.
Mix together your grout with water to get the right consistency using your mixing tool drill attachment. The specific product you are using will tell you exactly how much grout and how much water to use.
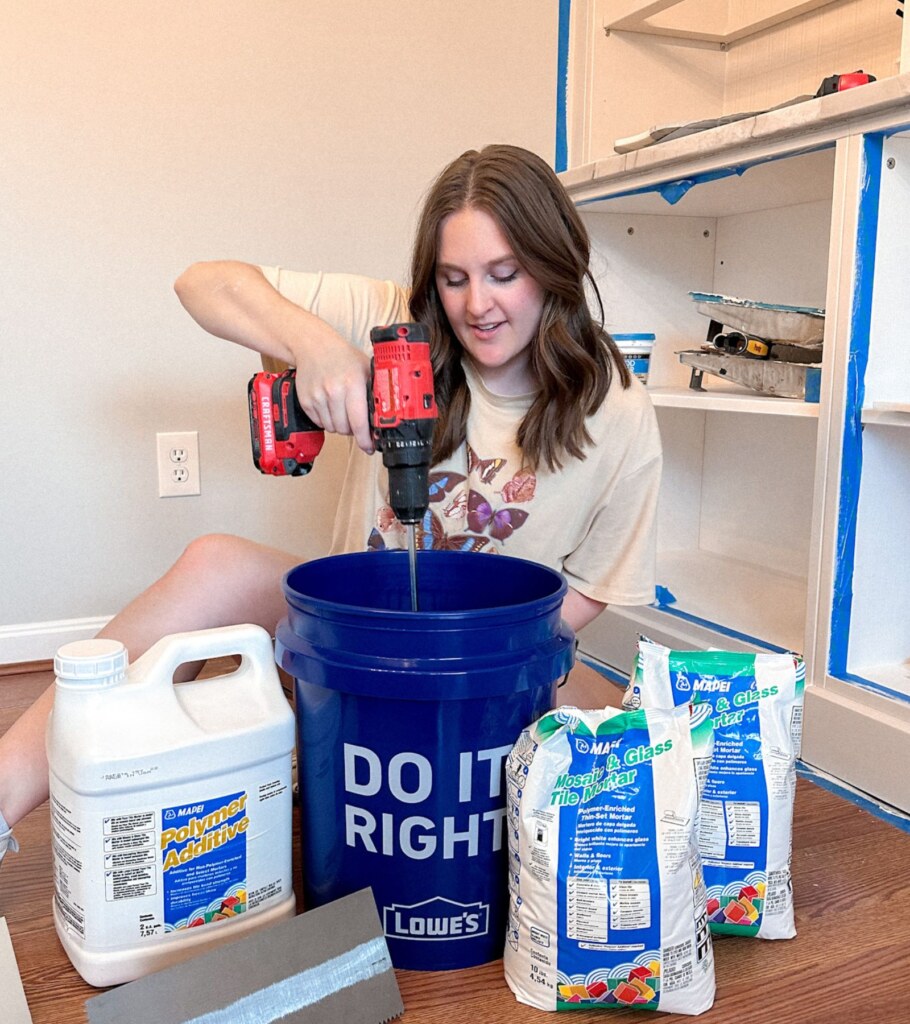
Typically you’ll mix for roughly 5 minutes, allow it to stand for some time, and then re-mix it prior to grouting.
Grouting is a little bit of a time crunch because you only have so long until the grout starts to dry out. With the products I’ve used, you have roughly an hour. You can always add a tad more water and re-mix along the way to keep the consistency the same.
You can also mix little batches of grout throughout the process if you are worried about the time crunch.
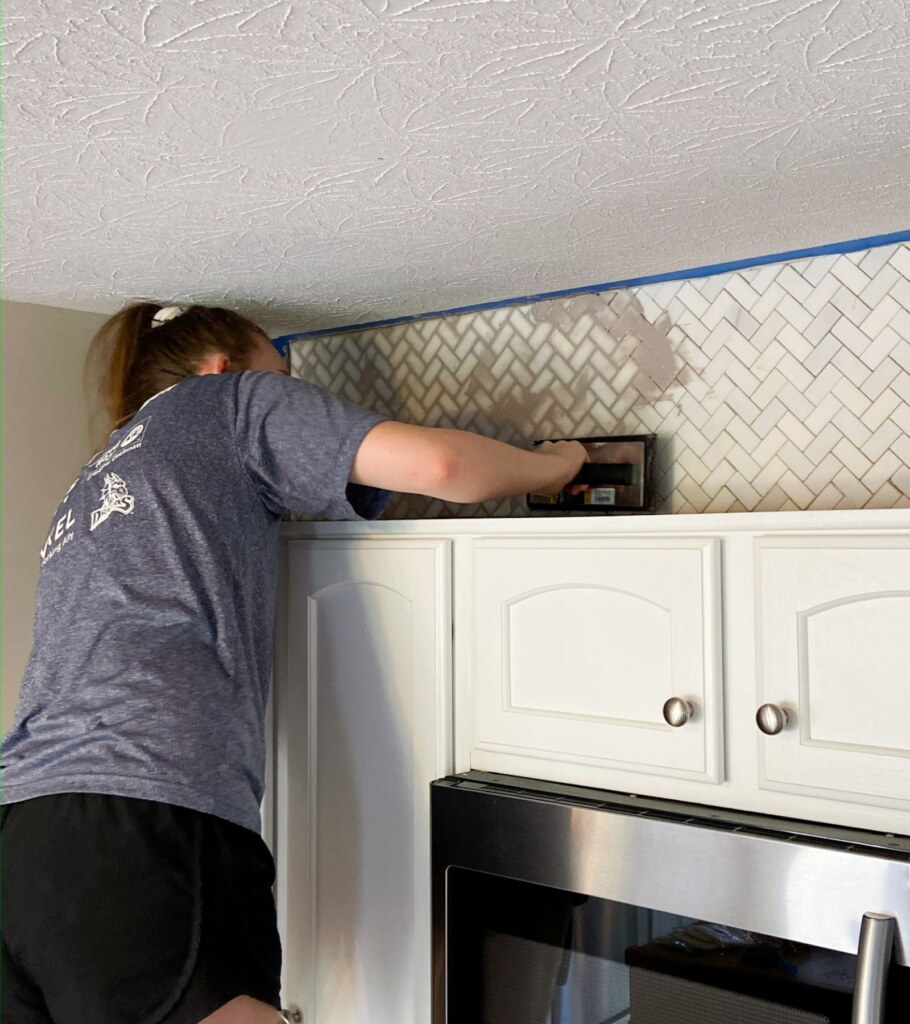
7. Apply the Grout
Apply the grout using a grout float at a 45-degree angle across your backsplash. Yes, you will be applying over the tiles, so don’t try to just get it in the cracks. We’ll be wiping off the tiles in the next step.
Be sure that as you move at a 45-degree angle, you have enough grout to where the gaps between the tiles are getting filled.
Once all gaps have been filled with grout, take your grout float and wipe away any excess grout on top of the tiles while it’s still slightly wet. Don’t press too hard as you don’t want to remove any of the grout from the grout joints.
Immediately move on to the next step!
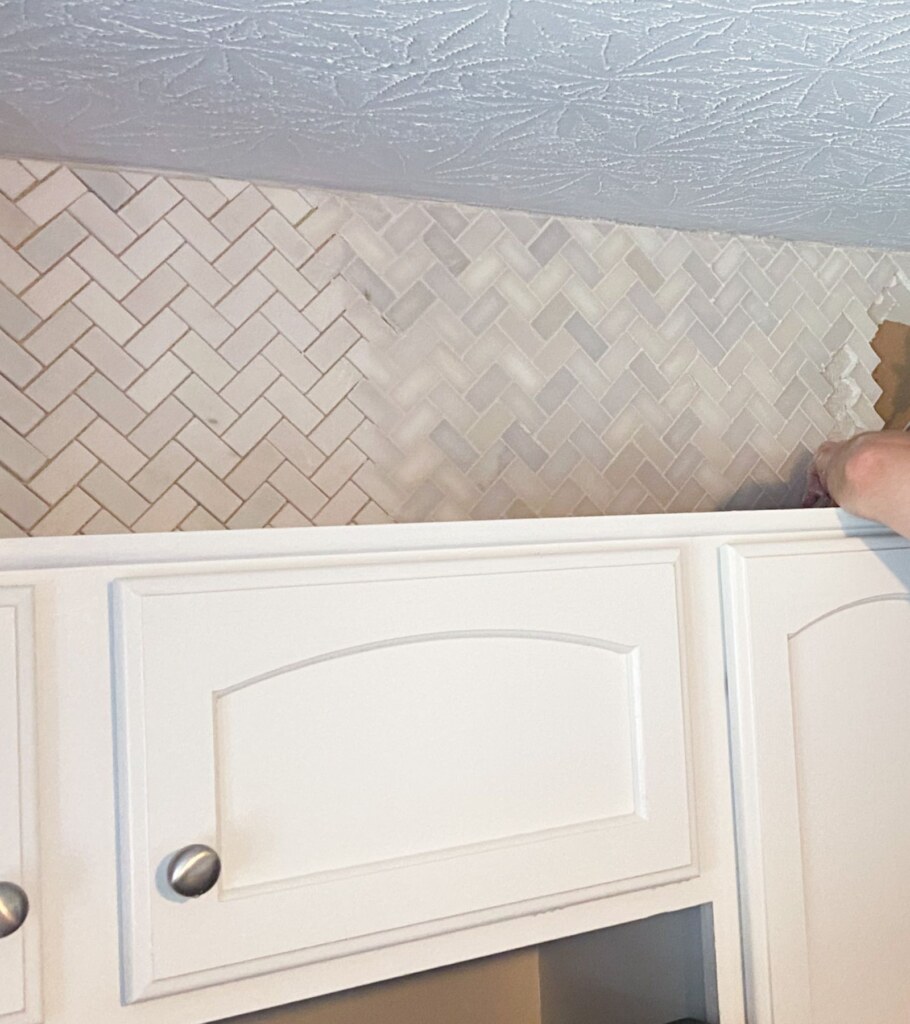
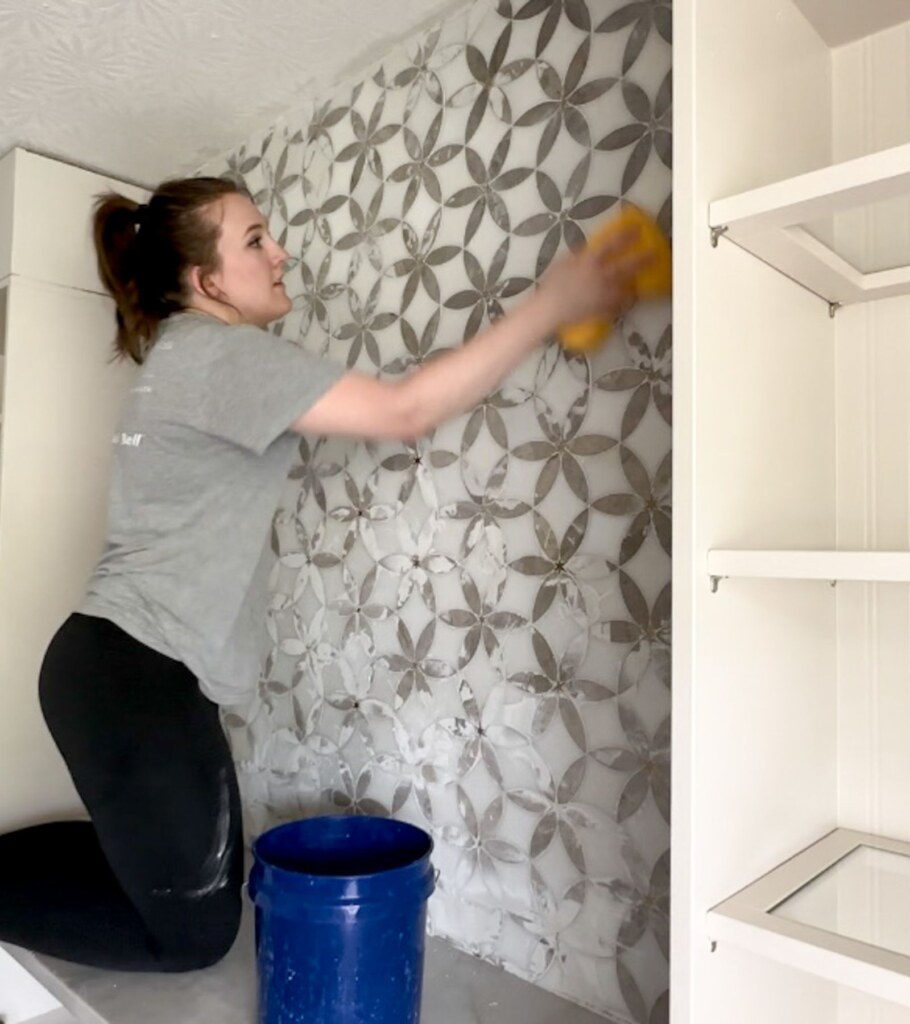
8. Sponge Away Excess Grout On Backsplash Tiles
Fill a bucket or two with clean, warm water and have several clean sponges lined up – I recommend this pack from Lowe’s!
Make sure that your sponges are damp and not soaking wet because you don’t want to accidentally remove any of your grout from the lines!
With your damp sponge, wipe away the excess grout in circular motions. It’s important to remove as much of the excess grout as possible. If the grout dries on your tile, it is going to be difficult to remove later.
Clean your sponge as much as needed throughout this process.
You want to clean all of the grout off until there is just a small haze left on your tile.
From here, wipe away a small section of tile in one direction, flip the sponge over, and wipe that same area with the opposite side. Once both sides of your sponge have been used, clean the sponge in your bucket of water.
The idea is that you do not want to go over any section with a dirty sponge (even if you used it for one swipe). You want the sponges to be as clean as possible when you are wiping.
Now move on to the next section above or below where you just were and repeat.
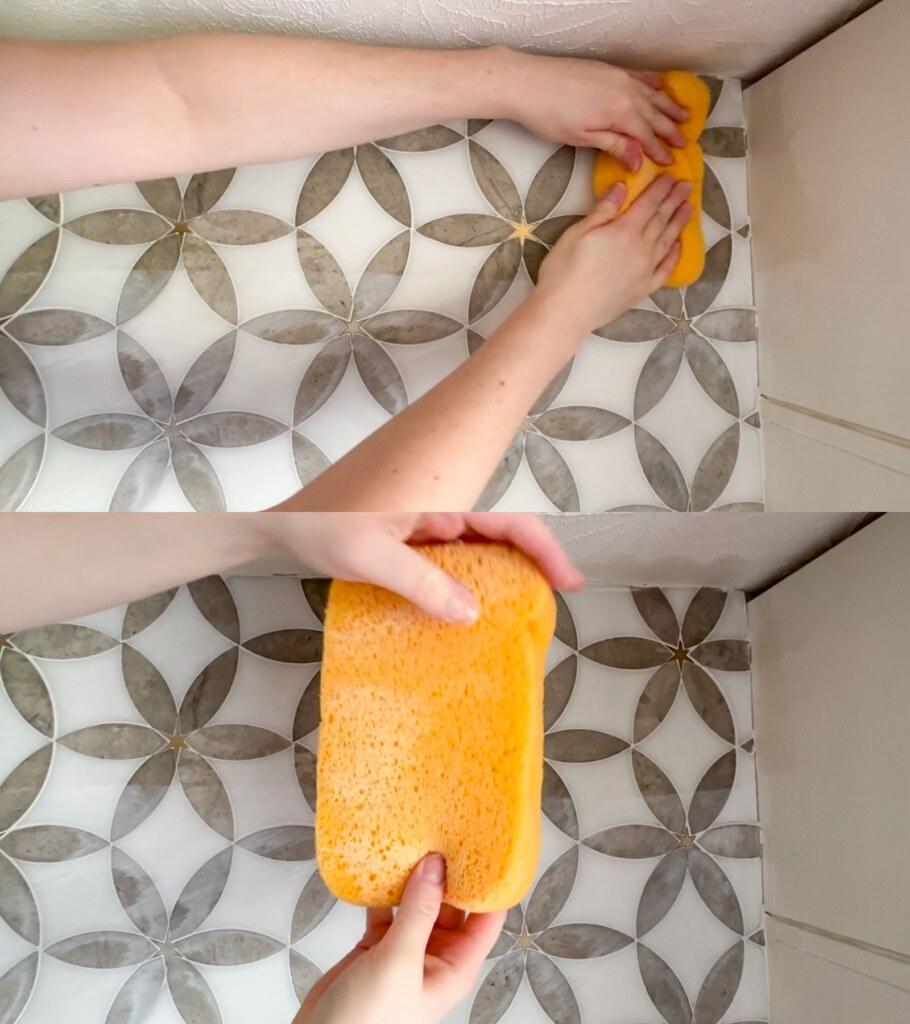
Essentially you get one wipe with each side of the sponge before you have to clean it. This will make sure you’re completely cleaning the grout off your tiles and not just spreading it around.
You will repeat the sponge wipes over and over again until your tiles look shiny and clean – like when you brought them home from the store.
You’ll need to make frequent water changes as your water becomes dirty! So having a friend during this process to refill your bucket will be helpful.
This process may seem tedious, however, it is way easier than scraping off dried grout later on.
Once you are in a spot where you feel good about your tile wiping, look closely at your grout lines. Sometimes tiny little air holes can form during the wiping process. I like to just take my finger, get a teeny tiny dot of grout from my mixing bucket, and touch it up.
Just be careful while doing this to keep those grout lines nice and crisp!
Allow your grout to dry based on the product instructions.
9. Caulk
Nobody’s perfect, and that’s what caulk is for! Especially your first time learning how to tile backsplash.
Usually, grout brands will also have a matching caulk that you can use around the perimeter of your backsplash to give it that finished look. As I mentioned previously, that’s why I love MAPEI, because the grout colors are simple, and they have the matching caulk to go with it.

Using your caulk gun, create a small bead of caulk around the entire perimeter of your backsplash. You can do small sections at a time to make sure you’re not dripping any caulk.
Dampen your finger, and smooth it along the bead of caulk. You can wipe off the excess caulk on your finger onto a paper towel as you go. Continue doing this until you’ve completely finished around the entire backsplash edge.
10. Seal Your Tile and Grout
Depending on the type of tile and grout that you used, you may need to seal it with a simple sealer. A lot of times, porcelain and ceramic tiles don’t need to be sealed, but it can vary based on the product.
Why should you seal tile and grout? Sealing your tile and grout will first protect your grout from stains or spills. Second, it’ll ensure your tiles are completely protected from all of the wild things your kitchen may endure.
Sealing will give your tile and grout durability that will make it last for years!
Each tile sealer is different, but generally, you’ll apply it via spray or wipe it on with a microfiber cloth. Then allow it to sit for 3-5 minutes, and wipe off the excess sealer. Usually, you’ll repeat this process two to three times before you can consider it completely sealed. Be sure to follow the product instructions.
I have only used the Superior Premium Gold Stone Sealer from The Tile Shop, so I can only speak to that. It’s very easy and straightforward to use. But other products you find at your hardware store will do the trick as well!
11. You’re Done – Woohoo!
And that’s it! You can now say that you know how to install tile backsplash, and better yet, that it was a DIY tile backsplash project. 😊 Congrats!


Leave a Reply