The below post may contain affiliate links. This means we will receive a commission if you purchase through our link, with no extra cost to you. As an Amazon Associate we earn from qualifying purchases. Read our full disclaimer.

When we first moved into our house, I didn’t think much about the windows. They were clean, basic, and builder-grade, which was fine, but they lacked ✨character✨. As soon as we added interior window trim, it was like the windows got a new life! The whole room instantly felt intentional and high-end!
For a simple DIY to make THIS big of an impact, I was shocked! Adding trim to your windows makes such a big difference without being overly complicated.
Here’s exactly how to add trim to windows, step by step, with a few helpful tips I learned throughout the process.
What You’ll Need For This Project:
Materials:🪵
- Wood trim/molding (Choose your style. We went with “Ornamental Mouldings 1/2-in x 2-3/4-in x 7-ft Unfinished Casing” from Lowe’s.)
- Wood filler, to fill all those tiny holes
- Primer & paint
- Paintable Caulk
Tools:✏️
- Measuring tape & pencil
- Miter saw (or hand saw + miter box)
- Nail gun & finishing nails (We used DeWALT 2” finishing nails)
- Sanding block or sandpaper
How To Add Interior Window Trim
Step 1: Measure Your Window
To get the most accurate measurement, measure your window from the inside of the window (corner to corner). This gives you the “inside corner length” you’ll need to make your cuts.
If your window has a sill, make sure to measure to the bottom of the sill and include that in your “inside corner length” measurement.


Don’t rush this step! Getting an accurate measurement is key to clean, professional-looking results.
Step 2: Cut Your Trim Pieces

For each window, you will need four pieces of trim:
- 2 vertical side pieces
- 1 top piece
- 1 bottom piece (the sill)
Each end of the boards will be cut at a 45-degree angle, so the corners fit together nicely.
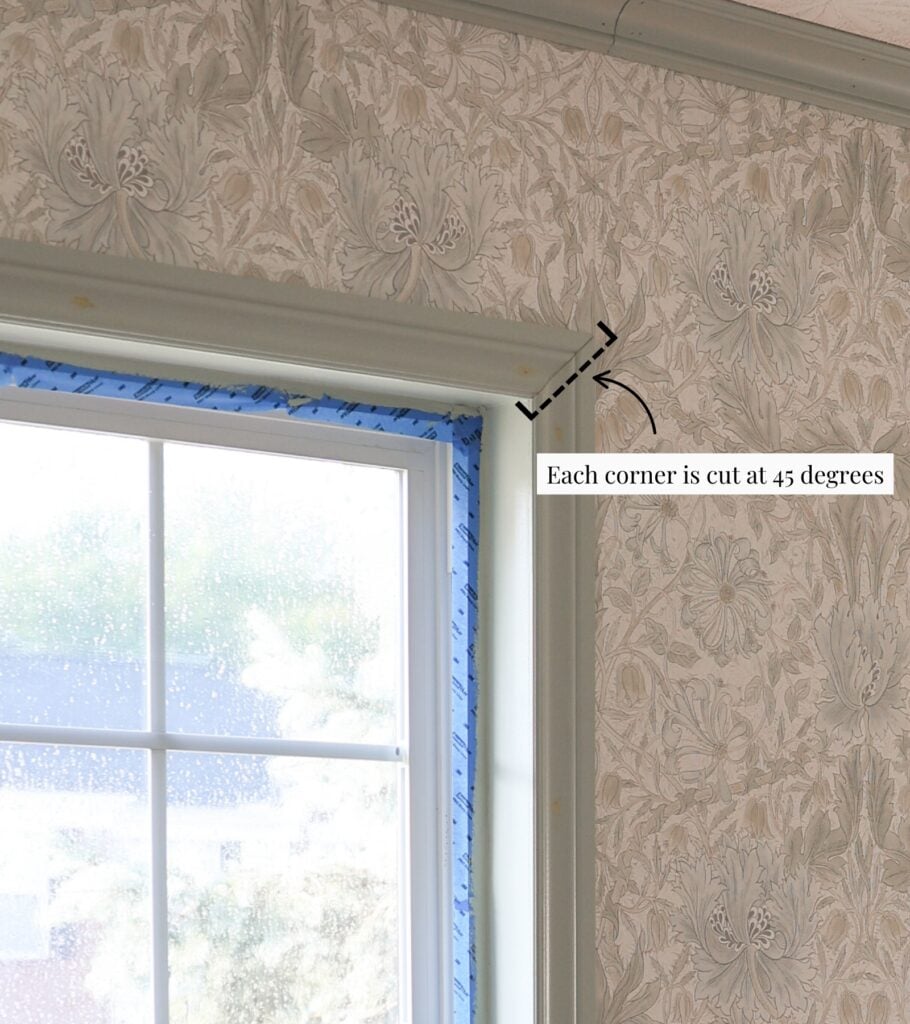
Take your measurements and cut accurately:
- Start with a fresh board.
- Make your first cut at a 45-degree angle (this angled edge will be your starting point).
- Take the “inside corner length” measurement.
- Mark this measurement on your board using the inside angle as your reference point.
- When cutting, line up the saw blade with the inside of your mark.


The outside corner should be longer than your original measurement; that’s how angled cuts work! As long as the inside corner matches your original measurement, that’s all that matters.
Step 3: Attach the Trim
This is where an extra set of hands makes this DIY a little easier! Before nailing anything, dry-fit all four boards around the window to make sure they align properly. If something feels off, make any small adjustments now (even if that means needing to recut).

Once you are happy with the fit:
- Hold the two side pieces in place.
- Position the top piece across and nail in the first piece using a nail gun and 2” finishing nails.
- Finish by securing the sides and bottom sill.

Step 4: Fill, Caulk, and Sand your Boards
This is where your project starts to feel finished!
- Fill every single nail hole with wood filler (there will be a lot, but it will look SO clean).
- Run a bead of paintable caulk along the edges where the interior window trim meets the wall to hide any gaps.
- Caulk the space between where the 45-degree angled cuts meet on each board.
- Sand everything down so it’s nice and smooth.
Step 5: Paint or Stain
Now, this is the fun part! I painted my trim the same color as my baseboards and crown molding to give it a seamless, cohesive look. But, no matter what color or stain you choose, just make sure you love it!
RELATED POST: The Best Sage Green Paint Colors
Once you make your selection, paint everything. It might require two or more coats!

The Before and After
I truly wish I could bottle up the moment you step back and look at your newly trimmed windows for the first time. It is SUCH a satisfying transformation. Your space will instantly feel more elevated and intentional.
Just look at the before and after in this room!


Now I want to do this on the rest of my windows! Haha
Final Thoughts
If you have been on the fence about this project, let me be the one to say… GO for it! Adding trim to windows is one of those small changes that makes a huge difference. It’s affordable, beginner-friendly, and adds more character to your home.
And with so many interior window trim ideas out there, you will be sure to find a window trim style that matches your home.
So, are you going to take on this project?

If you loved this simple step-by-step weekend project, check out some of our other favorite DIY projects we have done!
The easiest picture frame molding project:
- EASY DIY Picture Frame Molding You Can Totally Do Yourself (No Experience Needed!)
- The Best Picture Frame Molding Calculator (Box Trim Made Easy!)
Our viral DIY Built-In in our dining room:

Leave a Reply